Friday, June 28, 2013

New Do Revealed - Blonde Ambition

The new do came out super cute and super blonde.  I love it I don't think I've been this blonde in many years it's kind of nice change and the cut sure is too.  Yesterday I showed the inspiration for the cut and color and now you can see how it looks!

So what do you think?

First we had to process it from all my colors to blonde
the next step went so fast no pic.

Now the reveal!


Hope you all have a great weekend!

Thursday, June 27, 2013

New Summer Do with Skinny Face

As most of you know my one real luxury is getting my hair done every 2 months.  I have been very blessed that my cousin is a hair dresser and let's me invade her house kids and all and invade her house for a little pampering for me!  Now that I'm almost at my goal weight I think I'm going to go a little daring and cut my hair very short in an asymmetrical bob.   Now I usually have a bob with the back cut short.  Now I'm going to go pretty short and very blonde.  I'm hoping I can pull this off!  With my face looking thinner I so have high hopes for this one!  So off to google I went and found a cut I like and then I went on a color mission!  So what do you think?  I'll reveal my new look on Friday!!!  For now here is the inspiration:

The Cut

The Color

Wish me luck!

Tuesday, June 25, 2013

For the Wedding Planner or The Bride to Be ... Bridal Survival Kits

My new friend and co-worker is also a wedding planner.  Her birthday was a few days before mine and I wanted to do something special for her.  I went to my handy dandy pinterest boards and came across a Bridal Emergency Kit on Project Wedding.  100 Layer Cake provided this super simple Bridal Survival Kit printable.  Let's just say my canvas bag met the iron and water leaked on it leaving a horrible water stain!  So I went to plan c and used a bag that had a cute saying on it that my amazing friend Amy gave me a while back.  It so saved me in the last minute to get this gift out the door!


Between the printer not worker, the iron on's not sticking and then the iron leaking this gift took me 2 days to get out the door and I missed her bday by a day.  At first I thought this is just not meant to happen ... LOL but I pushed through and I'm happy to say she loved it and she even passed one of the bags out to her bride that weekend!

This is a super simple one to make and so sweet to give to a bride to be.  Most of these items can be found in the travel isle at your local store or heck the dollar tree has a great travel section with name brand items.

What You Need (I made a few different bags to put together) :
Canvas Bag
Iron On 
Reliable Iron that doesn't leak
Printer
Clear Plastic Bags (Small 60 for $1 or Large 25 for $1 Dollar Tree)
Stapler
Card Stock

Here are the Bags I did:

Fresh Breath Saver:
Gum
Breath Mints
Tick Tacks (I didn't find)

The Oppsie Saver:
Band-Aids
Tums (just in case tummy ache)
Advil or Tylenol

Kiss Me Saver
Travel Toothbrush
Wisp Colgate Whitening Mini Brushes
Tooth Paste
Mouth Wash
Bianca Strips

Snackable Saver
Nuts
100 Calorie Packs 

Pretty Me Saver
Lotion
Nail Clippers
Emory Board
Cuticle Pusher
Cuticle Trimmer
Deodorant for those moments you need to feel fresh

Keep You Fresh Saver
Kleenex
Purell Sanitizer Packets
Stain Remover Pen
Superaway Lipcolor Remover

When All Else Fails .... (this is my favorite I came up with)
Super Glue
Chocolate
Note: If All Fails Super Glue it and Eat Chocolate! :)

I packed these up in a cute bag and put them in the mail to my co-worker she lives on the other side of the US like my bosses so I had to put it in the mail for her.

Here is my failed attempts!

All put together!

Since we are in the wedding season this really would make a great gift for a bridal shower or to give to the bride the morning of her wedding.  It is very thoughtful and I must say super cute!

Hope you make this for someone special!

Don't forget to see the parties I link up to HERE.

Monday, June 24, 2013

Party Invites ... 4th of July Invites Done!

We usually don't do anything big for the 4th.  We do go to my parents waterfront house and watch everyone blow off their money.  We go early let the kids swim, have a BBQ and enjoy who ever shows up.  You know me and love a good theme so why not send out cute 4th invites.  I found this really cute FREE Printable on American Felt and Craft's Blog.  


What you need:
Card Stock
Scissors
Envelope
Printer

I copied her free printout and put in a word document using a text box (with no fill and no lines). I put the words on top of the the photo I copied.  Super simple and easy to do.  I printed on white card stock, took my scissors and cut it out.  I picked up these blue envelopes at Walmart for $3 and I'm ready to go.  I may even get crafty and print labels!


And just wait you know there will be themed food to come!!

Don't forget to see the parties I link up to HERE.

Sunday, June 23, 2013

Party Invites ... Mickey Mouse Head Invites

Caden has decided on Mickey Mouse for his birthday theme.  So on the hunt I went to find a cool Mickey Mouse invite.  I saw MANY ideas of a Mickey Mouse head invite but no one had a step by step how to do.  So I had to take the ideas I saw and kind of ran with it!


Here is what I came up with:

My first step was to buy a Mickey Mouse Cricket cartridge.  NOW I found several you-tube video's on how to make the circles yourself but let's just say I rather buy a kit that does it for me.  I found one on Amazon that had the characters and the Mickey Head I needed and it was super cheap!!  Regular $99 for $29.90 (Cricut 29-0382 Shape Mickey and Friends Cartridge for Cricut Cutting Machines).  Now figuring out how to print the head took me HOURS and an hour on the phone with Cricut Tech Support!  ALL you have to do is press shift + icon and then click on Mickey (the one in the star). EVEN though the girl from Tech support told me this wouldn't work it DID!!  I made the cricut cut go to the largest it could do and printed.  I believe I got 2 heads per half sheet I put in my machine.


Shift bottom button on left
Icon 3 button down on left
Mickey star is 3rd top bottom over on left

What you Need:
Mickey & Friend Cricut Cartridge

Black Card Stock
Red Card Stock
White Card Stock
Ribbon (Red with White Dots)
Yellow Buttons
Glue Gun
Glue Stick
Cricut Machine
Circle Cutter

Instructions:

  1. Cut Black Mickey Heads
  2. Cut Red Circles / I cut of 1/4 of the top to make it a 3/4 circle (I measured the size of the Mickey Head to find out what size circle I needed)
  3. Took hot glue gun to glue on yellow buttons.
  4. Took hot glue gun to glue on ribbon, pinched in middle to make look like a bow.
  5. Glue stick around the outer edge of the black circle to stick the red on top.  REMEMBER you need to put the invite inside so stick close to edge.
  6. Print on white cardstock your invite.  
  7. Cut with a circle cutter make sure it is small enough to fit inside your pocket you made.


Easy Peasy and yup I'll have like 30 to make ... lol.

 Meeska, Mooska, Mouseketeers
Come one, come all,
Help us celebrate!

Don't forget to see the parties I link up to HERE.

Friday, June 21, 2013

Summer time means Lego Fun ... Right?

Summer break has hit our house for 21 days now, YIPEE!!  When mom works from home that means fun times for mom.  Our sweet neighbor boy is still in school so that means the boys could play nicely together right? WRONG it means we have to argue and constantly ask mom for things!

We have thankfully taken to making Lego sculptures, that is when we are not yelling at each other that the other stole said Lego from the others room.  Oh summer fairy will come to me and find me a cheap summer program to put one of the boys??  YUP that is mom's prayer this summer, I'll keep praying on that one.  

For now I leave you with Caden who is the "take my picture mom" king of his latest creations.  He created these all by himself and I must say I could actually see what he told me it was!


And to make you laugh:
Key to winning a Krumping contest? Step on a Lego and let the reaction take It from there.

Have a GREAT weekend!!

Wednesday, June 19, 2013

37th Year Celebrated in Style

I had such a great birthday this year.  I really did have the best time and was so grateful to celebrate with some great friends and family.

Friday the boys and I picked up Oz the Great and Powerful.  Now you all know my feeling about movie remakes this is kind of like what Star War's did and did a prequel the moments that lead up to the movie you love.  I must say it was ok in the beginning towards the end it did pick up and we enjoyed it.  The boys enjoyed pizza and popcorn, while I ate my hamburger patties.  I was being good and stuck to the diet that night.

Movie Night

Saturday we had a busy day, I worked got a quick weight lifting work out and even tried out my new running shoes for 3 miles.  The boys and I ran up to see my mom and dad to pick up my gift.  It was so excited to see a gift card for Cheesecake Factory since Rick and I were heading up there on Sunday.  We then ran to my friends house for a candle party and let the kids go swimming for a bit.  My friend was so sweet she even had balloons and a very sweet bakers basket for me!! We then made a mad dash to take the kids to the YMCA Kids night out!  I then ran home and put on a new pair of blue skinny pants and I hit the town.  I meet up with my woman's group for dinner, I really thought it would be an early night but we had so much fun watching the line dancing that started at 9pm after the restaurant turned to a country bar.  Which mind you NONE of us are country fans so it was a new experience for us.  We ended up staying until after 10pm!  I'm so bummed that I didn't get a picture of all of us.

New shoes and pants for my 3 mile walk.

My amazing bakers gift basket!

Dinner Night with my Women's Night

Sunday Rick's schedule changed from day to afternoon.   So we had to do breakfast at the Cheesecake Factory.  I ate a meal that followed my diet plan but I did splurge and went with the full on cheesecake not the low carb version I was going to go with.  I thought I deserved a little something special!  We got home Rick ran to work and the boys and I headed up to the lake to hang with my childhood friend at her dock (2 down from my parents).


Rick got his Avacado Eggrolls, Coke and a Salad (and my toast)
I had a omelet with meat and cheese and a Kahlua Cheesecake

It was the best weekend I could have ever asked for!
Thank you so much for all the birthday wishes!

Tuesday, June 18, 2013

Beach Bingo ... Beach Themed Cupcakes (Coconut Drink & Beach Ball Toppers)

And we wrap with the last two cupcake themes I made for the party.  These last two ideas came from Party Pinching and a post featuring beach themed cupcakes on a budget!  These again are so easy and cheap (oh yes you know my motto cheap and ahhh dropping).  

If you missed yesterday's post. I started with making 2 batches of cupcakes using my favorite homemade yellow cake mix and 2 batches of my favorite sturdy buttercream frosting.

This post will feature:

The first to show off (or technically the third if you're reading this after yesterdays post) is the super easy and I think the coolest looking one Coconut Drink Topper.  Don't we all want a fruit drink while sitting on the beach?  Why not have a cupcake that will give you that same feeling with out the alcohol since I was serving kids!


What you Need:
Frosted Cupcakes
Whoppers
Icing
Twizzler Pull Aparts
Sprinklers (I used little stars)
Umbrella's (optional but I thought it added character)

Take a sharp knife and cut of just 1/8 of the top of a whopper (mostly just the chocolate part of the top).  Add a little swirl of icing to the part that you just cut off, I made it look kind of like what a drink looks like.  Cut a little strip of Twizzler pull-apart for your straw.  I added a star as a little fun topper, I've seen some with regular sprinkles but I wanted something fun. I then added to a frosted cupcake (I had some Peanut Butter Sturdy Buttercream left over from another recipe (post to come) so that is why this frosting looking brown vs. white).  I topped with an umbrella because it felt like they needed something.


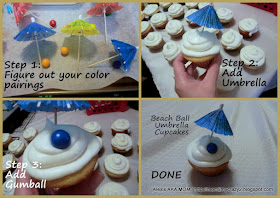
And last on my list to do was the easiest one to make, Cole actually put these together for me.  Yes Control FREAK mom actually handed this cupcake over!  These are to look like a beachball with an umbrella.


What you Need:
Frosted Cupcakes
Gumballs
Paper Umbrella's

YUP easy frost a cupcake plop a gumball on and top with a paper umbrella.  OH yes I told you it was simple but they were so stinking cute!


And was a quick add on I made this super quick umbrella centerpiece.  I wish I would have had two boxes of the umbrella's but my dollar store only had 2 and I used the other for the cupcakes.


What you Need:
Foam Circle / or Floral Circle
Paper Umbrella's 

Open up umbrella's be careful not to break them, I gave them a little loosing up and then let Caden open up the umbrella's and we stuck them around the floral circle we picked up at the dollar store also.  Would have been nicer to have it fuller but it was perfect and CHEAP for the theme!


We had a great time and everyone had such nice things to say about the food and the cupcakes.
A BIG thanks to my helper Cole who bagged & tied them for me.

As I keep saying the idea to put the cupcakes in a plastic cup, a clear bag and tie with a ribbon has been the most used and AWESOME idea I have ever come across on Pinterest.  Whoever thought of this needs to win the award of most awesome person and helper to mom party planners.

Have a Beach tastic Day!!  Hope you give one of these a try!

Don't forget to see the parties I link up to HERE.

Monday, June 17, 2013

Beach Bingo ... Beach Themed Cupcakes (Fondant Beach Balls & Popsicle Sticks)

Now onto the cupcakes made for the party!  NOW don't shake your head I didn't go totally nuts this time around I ONLY made 4 different types of cupcakes.  I'll feature two here today and then two tomorrow not to overwhelm you or make one heck of a long post.

While searching the internet for pool themed food I came across Party Pinching and a post featuring beach themed cupcakes on a budget!  I narrowed down my list to only four to make, well three they featured and one I made up on my own.


I started with making 2 batches of cupcakes using my favorite homemade yellow cake mix and 2 batches of my favorite sturdy buttercream frosting.


First on the list to do is Fondant Beach Ball Cupcake Toppers.


As you know I'm now in LOVE with this rolled buttercream fondant, that is super simple to make.  Click the name and it will take you to recipe, trying not to repeat the same thing over and over and have you all do an eye roll on me.


I wanted to do something fun and this fondant is so easy why not make beach balls with 3 colors!  I took my fondant made 3 balls, I then dyed each a color of the beach ball I wanted using Wilton Food Icing Color.  I then rolled out 1" strips of each color and pressed them together with my pamper chef roller.  It came out perfect, I then took what I think is a whiskey glass to make perfect circles (yes you can laugh we got them for our wedding & of course what do I use them for baking ... lol). I would try to get 3 balls out each time and then I would change the color line up. (blue, yellow and then green.  Next time Yellow, Green and Blue and so on).


I frosted each cupcake and then my helper topped them with a fondant Beach Ball.  We then put them in plastic cupcakes, a plastic bag and tied with ribbon.  

What you Need:
Baked Cupcake
Frosting
Fondant (3 Balls)
Wilton Icing Color
Wilton Cut and Roll Mat (or any mat)
Circle Cutter or Glass

Next on my list was the easiest cupcake ever!!  I made little Popsicle toppers to go on top of cupcakes.


What you Need:
Baked Cupcake
Frosting
Mike & Ikes
Toothpick

Break toothpick in half, take the broken half and shove into the fatter side of the Mike and Ike (one side is thin like a top of a Popsicle and other end fat like the bottom).  And your done!  I added two of the same color to the top of a frosted cupcake.  Again we then added cupcakes to a clear cup, clear bag and tied with a ribbon.


I must say serving cupcakes this way has been the BEST idea I have ever used off pinterest.  When the people left the party they were able to take a cupcake home with out worrying about it getting everywhere.  And since NO one RSVP's these days I had no clue how many would show so I made 36 cupcakes to be on the safe side.  LET's just say parents and kids each took a cupcake home that day!

Have a Beach tastic Day!!  Hope you give one of these a try!

Don't forget to see the parties I link up to HERE.