We have entered into party planning time here at the house. Cole turns 9 tomorrow! With Rick gone we had to push the party out an extra week which gives me a little more time to do all these fun things I saw on Pinterest! I first started on a search for the perfect invite and a template how to do it. I loved these Light Saber invites I kept seeing but they were on a site where you had to buy them. You know me I rather make them! After 1 1/2 hours of searching I stumbled across The Purple Patch who was so great and gave you a template you can print for FREE. I love as you know these amazing people who offer templates!
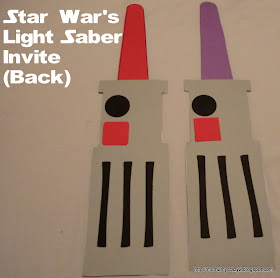
Now I tweaked it a bit to fit my needs and also my time! I had around 40 to make and knew that would be a LOT of cutting!! She gave a template for the button's circle and square. They are much smaller then mine. I decided to use my Cricut with the font that came with it (Cricut® George and Basic Shapes Cartridge) and cut out a circle and square. YUP that is ONLY after I went to THREE Micheal's and TWO Walmart's looking for punches to make these! For the lines on the back of the light saber I tried a few of the rectangles on the Cricut but ended up using the I ... I know brilliant huh?
I used her template for the front (Black with Stars) and added my own wording. I went on a search for the best wording. I also downloaded a Star Wars font, but when I went to print at Kinko's it some how came out with normal writing.
A Long time
Ago ...
In a galaxy
Far, far away ...
A future Jedi
Was born.
His Name?
(insert Name) Skywalker
Please Join us
For his graduation from Jedi Academy
(Name) (bday #)th Birthday
Date
Location
Will the force be with you?
RSVP Info
I printed the backs at home on Grey paper. I didn't use a shiny grey paper since I'm cheap ... lol I used just normal paper. I cut the black circle button's on the cricut and the red square also on the cricut. I printed the light saber's on green, red, blue and purple. I then had to cut these out along with the front and back (this takes a LOT of time, if your doing a large amount plan on a cutting party).
What you Need to do:
- Head over to The Purple Patch to get the printables HERE
- Take the Black with Stars I cut & copied her template putting 3 per page in a word document and added the wording above. I printed at Kinko's to save my ink.
- Then at home I printed the grey, the light sabers, the circles, squares and the lines.
- Take the grey put tape all around except the top (so the light saber an stick out and it's suppose to be able to move up and down)! NOW my black and grey didn't line up just right so I did have to do a little trimming to make it perfect (but I'm also a little nutty).
- Add a light saber and top with the black part of the invite.
- I then added the lines, square and circle. I used a tape gun for most of the job when it ran out I did use glue. The light saber is suppose to go up and down. I found with my gluing that it didn't always allow for that. But hey they still look cool.
These are time consuming but I think they turned out so cool! I hope you give them a shot! More fun Star War themed things to come, the next two weeks I have a lot to do and show!
May the Force be with you!
Don't forget to see the parties I link up to HERE.


YOU ARE A FREAKING ROCK STAR!!!!!
ReplyDelete<3 love ya Thank you!
ReplyDeleteI'm a HUGE Star Wars fan, so I LOVE these. Now I want to throw my boys a Star Wars themed birthday party in August!!
ReplyDeleteNow I feel like a fool for using store bought invites all those years. Doing something like this is WAY better. Love these!
ReplyDeleteThese are simply adorable! I have HUGE Star Wars fans at my house! I should also mention my sons' friends are as well! Please come by and link up these awesome invites at my linky party going on now! These would be a hit I am sure!
ReplyDeleteShelley
www.piggyinpolkadots.com
They are amazing. Good job!
ReplyDeleteThese are simply AWESOME!
ReplyDeleteSO much work, but they turned out awesome!! :-)
ReplyDeleteWhat fun invites and a true labor of love! I love to make my own invitations that match my party theme - it just makes it that much more special and gets everyone excited! Thanks for sharing your fun idea. I love all of the saber colors!
ReplyDeleteSuper adorable! My boys would have loved this when they were littler!!
ReplyDeleteThank you so SO much for this! I made it and it was so much fun :) I did cheat slightly by adding the lines and buttons on the handle using auto-shape on Word, and cutting the laser free hand. But the end result wasn't bad so I'm not fussed :D So again Thank you!!
ReplyDeleteI am sitting here trying to do these. Super cute! Could you tell me how you put the font on the Black with white stars? I have copied the template into a Word document. How do I get font to go over it?
ReplyDeleteI took her template and copied into a word doc. That way I could get 3 per page.
Delete