Wednesday, April 30, 2014

Prepping for the Party

We are getting close to the party on Saturday!  I have a few last minute things to make, bake the cupcakes and get decorations ready.  Here are few things left on the to do list:


Minecraft Candy Bars for the Treat bags found on Keeping it Simple
Minecraft-boy-valentines (6)

Food Tents, Water Bottles & Banner found on Catch My Party
Free Minecraft Party Printables
Steve Head for Utensils - Found on Pinterest just image

TNT Licorice - Found on Pinterest just image

Dirt Blocks found on Haniela's

Minecraft Creeper's - Nerdy Nummies

Gold Apples AKA Caramel Apples found on the Chow
Basic Caramel Apple
Minecraft Cake (Cupcakes) - Mamma D and DaBoyz
Minecraft Creeper Cupcakes MommaDandDaBoyz.net

Card Keepsake book found on Happy as We know It
Wouldn't this be cool to do after the party

Have a great day!

Tuesday, April 29, 2014

Minecraft Birthday Party ... Creeper & Pig Candy Tubes (Can be Gumballs)

Next on my list for the party was a pretty easy one.  I saw on Pinterest these really cool Gumball Tubes, of course it was a picture only so no one to credit or to find out what they did.  So I went on search to make my own.  I first went to Amazon to see how much they were.  The Tubes were almost $2 a piece and then the gumballs came in bags so I would have to buy 2 bags (one green and one pink, if I wanted to do the TNT then red too).  Well I added it up and that was like $35 - $40.  So I went to Michael's and Hobby Lobby hoping to find the stuff I wanted no luck.  So Plan B came into plan, Hobby Lobby had these Jewelry plastic tubes a 4pk for $2.49.  No luck on the gumballs so I hit up Winco Bulk Section.  I found Green Gumdrops and then they had the Easter Candy left so I found the bright Pink Malt Balls (shaped like an oval but I'm not being choosy). 


What you Need:
Candy Tubes (Or Jewelry Tubes)
Pink Round Candy (or 1" Gumballs)
Green Round Candy (or 1" Gumballs)
White Card Stock
Circle Cutter
Hot Glue Gun

I took the Clear tube and added 4 pieces of candy (one color per tube), then I put the cap back on.  For the Faces (I used just the Pig and the Creeper) I found these Cupcake Tags, I copied into a word doc and Edited it by cropping out just the characters I wanted and enlarging to the size I wanted.  I then took my circle cutter (cheap and best investment) and cut the circles out.  I took my , then with my glue gun I added a dab of glue to the back of the circle.  You can either add to the top of the cap or to the front of the tube, I did both.  I must say I like it on to so it shows off the whole tube.  Simple and Easy but they look so freaking cool!


Any Themed Parties planned?

Monday, April 28, 2014

Minecraft Birthday Party ... Creeper Treat Bags

Now we need a bag for the kids to take home their treats in!  I found several ideas on Pinterest and Etsy but no real template how to do so I winged it.  At first I thought about taking electrical tape and make a creeper face.  But then I got to thinking that would be so much work.  Plan B came to me, take a green bag use a template for a creeper face and color it in!

What you need:
Green Bags (Hobby Lobby 12 bags $1.50)
Black Sharpie
Printer w/ white paper to make a template

I went to google and found a creeper face (PNG image) and copied it in a Word doc.  I printed this and cut out the black of the creeper face parts.  I made this into my template.  I put the template on my green bag and outlined the creeper face with my sharpie.  I then removed the template, called my birthday boy over and he colored them in for me :).  Now to add the goodies, I'll show a full bag soon :).


Any Themed Parties planned?

Sunday, April 27, 2014

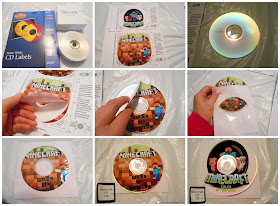
Minecraft Birthday Party ... Minecraft Music CD (for Gift Bags)

Next on the Minecraft Birthday Party train is items for the treat bag.  I saw on Pinterest a few pictures only (so no one to give credit to) of a CD.  I so can do that, easy enough.  We already had some Minecraft songs downloaded on Apple iTunes.  I found Covered in Blocks which had 8 parody songs ($8.91).  I took the 17 songs we had on iTunes and burned them to CD's.  

I couldn't find a Minecraft CD template so I downloaded the Avery CD template and added my photos and words.  Now when I worked for the plastic surgery clinic I was a CD making machine.  We would make our own CD's and attach labels and I would use the CD stamper that put labels on straight etc.  This time I just very carefully added the labels to the blank CD's.
What you Need:
Blank CD-R
Blank CD Labels
CD Sleeves
Printer

I opened the Blank CD in my computer and dragged the songs from iTunes onto the CD and clicked burned.  For the label I went to Google Searched Minecraft PNG images. PNG images have a blank background (not white that most images have). I copied the images and added to the CD template.  REMEMBER that you have a hole in the middle so be mindful of how the pictures are placed.  I added Cole's 10th Birthday to the bottom of each CD.  They turned out pretty darn cool.


Any Themed Parties planned?

Thursday, April 24, 2014

Meal Plan Week ... A little Carb Overload .. lol

It's time to plan our week again!  Rick will be back eating with us Tuesday so no more just kid friendly meals.  I'll be sticking to my diet so this will be the boys meal for the week.


Tuesday - Cube Steak and Potatoes (Rick back to eating dinner with us his fav)


Friday - Boy's Pick (probably Papa Murphy's)
Saturday - Spaghetti and Garlic Bread (Cole Request)
Meal Plan Monday


Have a GREAT weekend!!

Wednesday, April 23, 2014

It's a Wrap!

It's been a crazy week with a lot packed in.  We had Easter, Cole's 10th Bday and Me trying to put finishing touches on the coming party.  Plus a little gym funny!

We had a Egg hunt at my parents house.
All Money man to be a kid again .. lol

YES I know this is not what Easter is about
But I love our Church has a bunny.
This is probably the last year I'll get Cole
with the bunny so I'm taking it!

I surprised Cole with my dad for his birthday.
We delivered Pizza and the creeper Cupcakes.

I don't know what it is about me, BUT every day I start my class at the Y and then the late comers come in.  AND they always decide that my personal bubble is where they must be.  I actually had to walk away Wednesday due to 2 ladies who where so close they were touching me.  I have a big thing with my personal bubble .. lol.  Instead of having a panic attack or doing something I would regret I moved :).

This was so me! I swear they were glued to me!

Hope you all have a wonderful day!

Tuesday, April 22, 2014

Minecraft Birthday Party ... Minecraft Creeper Cupcakes

Today is Cole's 10th Birthday!  I wanted to surprise him at school with cupcakes for his friends.  Going with our Minecraft theme, I wanted to make Creeper Cupcakes.  I saw a version on Candy Bar Cupcakes that I took and ran with.


I started with a One Bowl Chocolate Cupcake recipe, I filled these cool brick square cupcake liners (found on Amazon).  I wanted a square cupcake so I found a square cupcake pan also on Amazon.


NGREDIENTS:
2 cups white sugar
1 3/4 cups all-purpose flour
3/4 cup unsweetened cocoa powder
1 1/2 teaspoons baking powder
1 1/2 teaspoons baking soda
1 teaspoon salt
2 eggs
1 cup milk
1/2 cup vegetable oil
2 teaspoons vanilla extract
1 cup boiling water
DIRECTIONS:
1.Preheat oven to 350 degrees F (175 degrees C). Grease and flour two nine inch round pans.
2.In a large bowl, stir together the sugar, flour, cocoa, baking powder, baking soda and salt. Add the eggs, milk, oil and vanilla, mix for 2 minutes on medium speed of mixer. Stir in the boiling water last. Batter will be thin. Pour evenly into the prepared pans.
3.Bake 30 to 35 minutes in the preheated oven, until the cake tests done with a toothpick. Cool in the pans for 10 minutes, then remove to a wire rack to cool completely.


After the cupcakes had cooled I frosted them and added the fondant shapes.  I have learned that everytime I make my Sturdy Butter Cream Frosting and my Rolled Buttercream Fondant I have a ton left over.  Instead of throwing it away (yes I've done that before) I now freeze it.  

What you Need:
Square Cupcake Liners
Square Cupcakes
Frosting (colored green)
Fondant (colored black)
Square cookie Cutters (small and medium)

So today I pulled out my lefter over frosting and fondant and colored it the colors I wanted (using Wilton Icing Color).  I frosted the cupcakes Green.  I rolled my fondant using my small square cookie cutter I made the eyes.  For the mouth I cut a medium square, then took my small cookie cutter to cut the the top left and right and then the bottom middle.  I googled the creeper image and printed it out so I could reference it while I did mine.


These were actually easier then I thought, and I love how they turned out.

Monday, April 21, 2014

Minecraft Party ... Minecraft Perler Bead Characters

Yesterday I posted about the Minecraft Party I was doing for Cole's 10th Birthday.  Block invitations for the party have been made.  Today I will show you the fun Characters the boys and I made for the goody bags.  I saw several ideas on Pinterest but they all linked to Etsy websites selling them.  My bright idea was I can make these, Kitchen Magpie showed on her blog that they were easy to make so I can do it.  

WELL let me tell you this is time consuming, and those little beads don't always like to stay on the peg board. ALSO when ironing don't zoom across the board you will knock the beads off and have to start all over!  It was aggravating at times, but then my OCD kicked in and I couldn't stop making them.  I'm planning for 24 kids to be on the safe side and wanted 2 of these per bag so we needed 48 total made.

Here are two of the main characters:


What you Need:
Perler Beads (Found at Hobby Lobby)
Perler Bead Square Board (Found at Michael's)
Perler Bead Iron Paper (came with Board)
Hot Iron

I googled Minecraft perler bead templates and printed them out.  I bought the big bucket of beads thinking it would be easy to sort.  WRONG, next time I do this I will buy the one color per bag version of Amazon. We each took a character and started to work.  Little fingers are helpful when doing this project.  BE-CAREFUL when you put the iron on the paper, if you leave for too long it will become mush and gooey.

Here's a few of my favorites we made:

How to make:

Make your design on the board, we did 10x10 squares (10 beads high by 10 beads wide). Cover with the ironing paper, with a hot iron press down.  I let mine sit on top for 30 seconds then with the iron tip went around the edges.  When you are sure it's all connected flip it over, take the plastic board off and top with iron paper and iron the backside.  Let cool and they are ready to go.  I'll add some necklace string to them, I'll update this post later when I do that.


Here is the before and After's of a few:


UPDATE:
Here is me making them into necklaces
Any Themed Parties planned?

Sunday, April 20, 2014

Minecraft Party ... Minecraft Block Invites

This Wednesday Cole turns 10!!  Yes it sure has flown by.  Rick will be working so the party has been pushed out another weekend, which gives me extra time making the goodies.  As many of you know I'm a nut with parties and go crazy with themes!

Cole picked a theme of Minecraft.  For you who don't know about Minecarft it's a game about breaking and placing blocks. At first, people built structures to protect against nocturnal monsters, but as the game grew players worked together to create wonderful, imaginative things.
It can also be about adventuring with friends or watching the sun rise over a blocky ocean. It’s pretty. Brave players battle terrible things in The Nether, which is more scary than pretty. You can also visit a land of mushrooms if it sounds more like your cup of tea.


I found these really COOL printable block invites on Bonkers4Bottlecaps Etsy site.  I paid $2 for the easy printable!  She even sent it to me in a jpg form so I could edit it and add the wording.  I downloaded the Minecraft font off dafont.  

What you need:
Heavy Card Stock
Printer
Glue

Buy your download from her site, I copied into word and added the wording using the Minecraft font.  I even found a "Diamond Sword" image I added to the top of the invite.  The hardest part is cutting out the box. She has it easily marked where you fold.  Add a little glue let it seal and they are ready to go.  These invites will be given to Cole's Class since they would be hard to mail.  I have a different one that will be mailed that I'll show soon.


Any Themed Parties planned?

Thursday, April 17, 2014

Meal Plan Week of April 20 (Kid Friendly Meals)

It's that time again, plan our meals so I can hit the grocery store while the kids are in school, something about shopping by oneself is just so relaxing!  This week I'm still on my crazy all protein diet and Rick not eating with us it's all about the kids once more!  Kid Friendly Meals is what I'll be doing!

Friday - Boy's Pick (probably Papa Murphy's)
Saturday - Spaghetti and Garlic Bread 
Meal Plan Monday

Have a GREAT weekend!!