Protected by Copyscape Web Plagiarism Check

Sunday, February 12, 2017

You're Sweet Like Bubble Gum Valentine's Day Photo Card (DYI)

Tomorrow is Valentine's day and you all know I'm a little crazy and have to do DYI instead of store bought anything. I'm on a bit of a budget right now, so I found an inexpensive way to make photo Valentine cards for Caden's class. Cole being "too old for this mom" is out of my cool mom vibe .. ugh.

I found this idea for a Bubble Gum Card on Project Denneler it was simple to do with supplies I had on hand and what I could pick up at the Dollar Tree.


What you Need:
Photo Paper (or send out / I had a 20pk from previous purchase at Dollar Tree)
Pink Balloons (Dollar Tree / 15pk)
Bubble Gum (Dollar Tree / 1pk has around 15 pieces)
Clear Treat Bags (40pk Dollar Tree)
Scissors
Stapler

Take a photo of your kid like they are blowing a bubble. Upload to PicMonkey this is my favorite photo editor site. It's a FREE site for most templates, they have a royal package also. I then took Caden's photo lightened it up, added a heart and then the words "You're Sweet Like Bubble Gum! Caden". I also added a little heart in front of Caden's name. When you like what you did print OR send to your local 1 hour photo place. I happened one time to find Polaroid 4x6 photo sheets (20pk) at Dollar Tree. YUP I so loaded up on that $1 a pack is hard to beat. I bought so much I still have more to use and it's been several years ... lol!

Next you set up your station to get these rolled out. I had 26 to make for Caden's class.


First take a pair of scissors to cut a whole on the mouth area. I found it was easier to put the deflated balloon in first, then blow just a LITTLE and tie a knot to secure it. I bought 8 bags of bubble gum giving me about 5 pieces per each card. I added the gum to the clear bags I bought. I then took a stapler to attach the bag to the photo. I stapled right below the slot for the balloon that way the staple is hidden. Caden had a blast blowing the balloon's up. I had a bug card picked out but he really wanted to do another photo card (we've done a few over the years).


Click HERE to see who I link with.

Wednesday, February 10, 2016

Valentine Kisses Photo Card

I love to make gifts the kids give to others, valentine's are my favorite to do. We've done so many different versions but on to Google I went and found a photo card to make! I love this Valentine Kiss Photo idea on My Insanity.
 
What you Need:
Photo of kid (Close up is best, not full body)
Valentine Kiss Chocolates (Found mine at Winco in Bulk section)
Hot Glue Gun
 
I took the photo of Caden and uploaded to PicMonkey (they are a free photo editing site, I use it to put my blog name on all the pics I upload). I then added the heart and lips and fonts, you can use their font's or whatever font is loaded on your computer by clicking on your font. 
 
When my photo was all fixed up I sent them to Walgreen's one hour photo. NOW I didn't pay attention when I uploaded and some of my font was cut off, pay attention when you upload. I printed a few that we'll send to family from my home computer. Take your hot glue gun and glue the lips onto the photo. 
 

Happy Valentines Day!

Sunday, February 8, 2015

iPod Valentine Candy Gifts

The year is already flying by! Valentine's day lands on Saturday this year so I class party will be on Friday.  I was trying to do this a week ago but I did get this done the weekend before! This was a super easy one to make and perfect for Cole being in the 5th grade. I know this will my last year with him doing this for him so I wanted to find something fun but age appropriate.  I found several versions on pinterest, Delightful Order had a free printable for the iPod Valentine Candy.


What you Need:
Conversation Heart Box (I found a 5 pack mini's for $1 at Walmart)
Kisses or mini pb cups
White Card Stock
Ribbon (I used crafting string I had left over)
Glue Gun

Print the Free Template Delightful Order has on to card stock is best but plain paper would to. It has 3 per page, cut one out to glue to the conversation box.  Mine were mini so the box was smaller and the paper wrapped around more then it was suppose to but it still worked! I glued the string on the back under the paper and then cut a smaller piece to glue together like how a speaker wire looks like. I glued a kiss at the end of each of the string to be like the ear buds.  You can do this with ribbon and then just tie a 2nd smaller ribbon on to make the Y like the wires also. I'm a use what you have on hand type of girl.


Any Valentine gift Ideas you have planned?

Thanks for Stopping by!
Don't forget to see the parties I link up to HERE

Monday, February 10, 2014

Cupid Time ... I Mustache you a Question (Valentine Cards)

Next on the Valentines Card to do was for Cole's Class.  Since he wanted something fun but a little more grown up.  I found these I mustache you a question on The Craft Monkey.  They are super cute, I went to PicMonkey and edited my photo.  NOW I couldn't get one just right 4x6 so I made a 5x7 and then cropped it down to the right size at Walgreen's.  They didn't become perfect but I think they came out pretty darn cute!  I hit up Micheal's and bought felt with sticky back.  I did a Google search for mustache templates and came across some I liked on See Cate Create.  I traced my mustaches on the back of the felt and then cut them out!


What You Need:
Photo 
Photo Edited 
Black Felt w/ Sticky Backing 
Hot Glue

Here's the photo I made up (with out the added mustache).

Take a picture of your young one with a mustache on.  I then added the photo and added the saying to the side and some fun hearts etc on the photo.  I added a little hot glue and stuck a different mustache onto each photo that the kids can peel off and put on if they would like.


Are you making Valentines?

Don't forget to see the parties I link up to HERE.

I leave you with some funny Cole Faces :)

Sunday, February 9, 2014

Cupid Time ... Fan"tache"tic Valentines Cards

It's time to put together valentines day cards again!  Since Mustache's are the rage this time, I had to make these for Caden's class.  I found these free printables Fan"tache"tic Valentines Cards on Plum Adorable.  I love her site I bought the thankful Thumb print tree last year on her site.  She has great printables you have to check her site out.   She had 4 colors to choose from I did the red and blue.


What you Need:
White Card Stock
Printer
Cutter (Scissors)
Hot Glue
Suckers

I printed her printable on some white card stock then took my paper cutter to trim them up.  I had Caden write his name on them.  I then took my handy hot glue gun and glued the suckers to the cards.  I found these really cool suckers at the Dollar Tree that had different sayings on each wrapper (like those nasty little heart candies).


Are you making Valentines?

Don't forget to see the parties I link up to HERE.

Wednesday, February 13, 2013

Valentine's Boxes Done & A "Manly" Gift

I finally finished the Valentine's boxes for the boys to take to school, I'm so grateful that Valentine's day is on Thursday this year it gave extra days to complete things!  These boxes I think turned out so cute!  I found the idea for the Monster and the Dog on Danielle's Place.  Her's are a bit more detailed then mine but I think the boys and I did a great job.

Monster - 

What you will need:
Tissue Box
Craft Foam or Colored Card Stock
Acrylic Patio Paint
Low Temp Mini Glue Gun
White Paper or Craft Foam for the Teeth
Multi-colored Feather Boa
White paper or craft foam for the teeth
Scissors
Googly Eyes
(Alexis Notes: I used loose multi colors feathers - cheaper. The dollar store had foam feet so I cut them down to make the monster feet.  I used a foam piece that I cut into the arms and the tongue.)

I'm sorry for instructions you will have to go to Danielle's Place she requested I take these down that it is stealing putting them up. She has also requested I take down the step by step pictures and direct you to her page.

Dog 

What you Need:
Tissue Box
Craft Foam or Colored Card Stock
Acrylic Patio Paint 
Low Temp Mini Glue Gun
White Paper or craft foam for the Teeth
Silver Chenille Stem
Brown Feather Boa
White paper
Scissors
Googly Eyes
(Alexis Notes - I skipped the Chenille Stem along with making a collar and used loose feathers instead of a Boa to save money)


I'm sorry for instructions you will have to go to Danielle's Place she requested I take these down that it is stealing putting them up. Pictures on how to do has also been taken down by her request.


Happy Valentine's Day!  I hope you all have a blessed day with wishes of love!


P.S. I had to add one more thing on.  Since I'm a such a good mom I almost missed doing a gift for Rick ... ugh.  So I found a "Manly" Valentine on The Crafty Blog Stalker's website.  I took this and made it to Rick's taste.  

You Need:
Jerky
Sugar Babies (Since he's my Sugar Daddy to my Sugar Babies)
glass vase (Dollar Tree)
Almond Joy (his favorite candy)
Sandies Cookies (his favorite cookie)
Trident (his favorite gum)
red ribbon

I tried to shove the sugar babies in their boxes in the glass vase but didn't fit so I took them out and put in the bottom of the vase.  I added the Jerk and used those as my anchors to hold in the other items.  I pushed the other items and done!  I added a balloon that say I love you :).


Ok now I'm done! LOL

Tuesday, February 12, 2013

You're the Bomb or Are you a Lady Bug?

On to our next Valentine Day gifts made!  Now most of you say why don't you just make two of the Pop-Pop Pop-ular Teacher Gift I made yesterday for Caden's teacher also.  Well on one of the first field trips I went on (where I made pumpkin patch cupcakes) I offered one to Caden's teacher who let me know her husband is a gluten free diet and she is going along to support him.   So I must find gifts that I can give her.  I found an idea to make bath bombs on Swift Crafy Monkey.  NOW the recipe is very easy but finding the Citric Acid for the recipe was my kryptonite.   I went to 3 Walmarts, Fred Meyers, Walgreens, Jo-Anne's, Michael's and Target!!  YUP I almost screamed at the last store the pharmacist at Target must have seen the tears or maybe the bright shade of red on my face and told me to go to Super Supplements.  This inexpensive gift I swear cost me $50 in gas ... lol.


Here is what you Need:
1/2 cup baking soda
1/4 cup citric acid
1 tsp oil of choice 
up to 2.5 ml fragrance oil
(Alexis Note: I used Olive Oil, because it's what I had and well I wasn't going to let this recipe make me do ONE more trip to the grocery store ... lol)

Mix the powdered parts together very well and make sure there aren't any big hunks of baking soda or citric acid in the mix. Add your oil and fragrance oil into the oils. Mix really well - it might fizz a bit. This is normal. Press into the molds very hard - pack a layer as hard as you can, then pack the next layer, until you've reached the top - and wait at least 45 minutes before removing (I found I had to let mine stay over night).   


I also made this shape

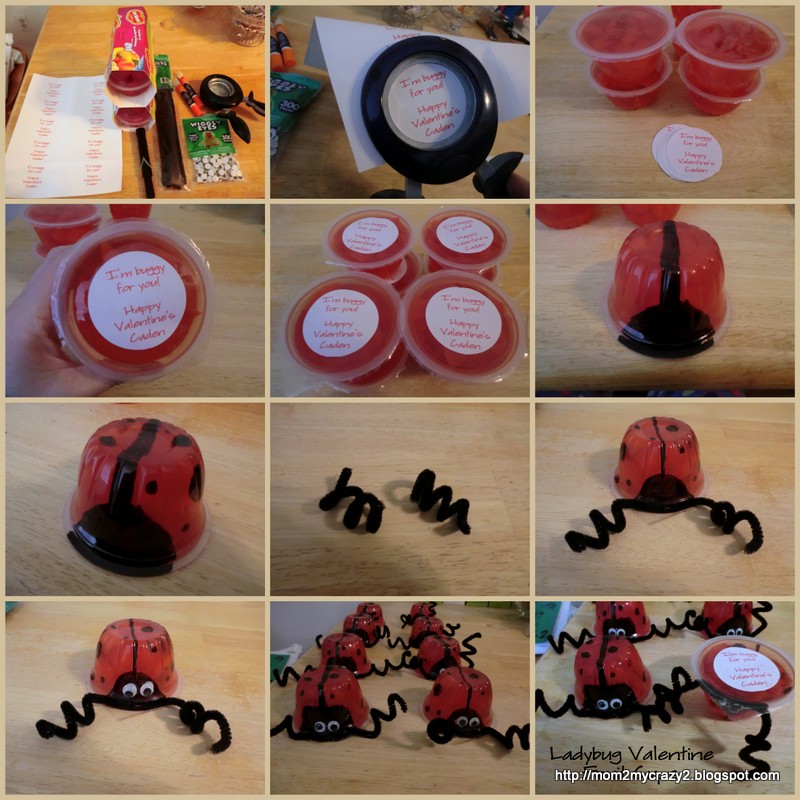
Next on the list to make is something special for Caden's class, I knew they would be getting a LOT of candy so why not make something that would be fun for the holiday but maybe a little on the healthier side.  Now I saw a pin on Pinterest saved it then went back to hit up the website to see how it was done!  So I click on it and guess what it's just linked to a picture (I tried searching again and ALL of them are linked to the same picture).  Don't you just HATE when you go for a pin and it's not pinned to the right website or even to a website.  Ok it's a pet peeve!)  So I ran with the picture and this is what I did, I added eyes (I thought it needed a little something) along with a personalized note on the bottom w/ labels that I cut out into a circle.
What you need:
Red Fruit Cup
Black Pipe Cleaner
Black Sharpie Pen
Glue
Wiggly Eyes (optional but I thought they were cute)

Take the fruit cup flip it over (leaving the plastic on of course so the gel stays inside), make a line down the middle, draw a black half circle for the face and dots on each side of the line.  Cut a pipe cleaner in half, glue onto the the fruit cup below the face.  Add a little curl at the end of each piper cleaner for the antenna's.  You're done!  You can add a little message onto the bottom if you want. (I searched for ladybug wording and found a cute saying on Skip to My Lou's website).


Aren't they cute?  I thought so!  Next on our mission to make is the valentine card boxes for each kid (Monster for Cole & Dog for Caden) and Popcorn Treat Bags for Cole's Class.

Hope you have a wonderful day!

Monday, February 11, 2013

Super Hero's & Popcorn ... What More Could you Want?

Well I finished two more of more Valentine Day projects!  3 more to go but let's just hope I finish those tomorrow.  Today I show off Caden's class Valentine's and a gift for Cole's teacher.

First off we start with the Superhero Valentines I found on Little Bit Funky.  The super cute cape printable is found on Less Ordinary Designs, they are free make sure you say thank you.

What you Need:
Superhero Printable FREE from Less Ordinary Designs 
stiff felt (I used foam sheets from the Dollar Store)
hole punch
2in paper punch (or you can use scissors)
coordinating ribbon
lollipops (tootsie pops have nice superhero colors)
glue (hot or craft will work)
cape template

Cut or Punch out the superhero circles and emblems for the capes.  Cut the cape (I created one you can use it if you would like.  Just save the picture and print, I used it as a template to cut the capes out). Glue the superhero emblems onto the capes. Use a hole punch to punch hole in the top of the cape.  Slide the lollipop through the hole and tie a coordinating ribbon below. Punch a hole in the top and bottom of the word circles and slide onto the stick.  They were very cute and easy to make.


Last on the list to do is a teacher gift.   I found a picture on Marci Coombs website for The Pop-Pop Pop-ular Teacher! Valentine's Gift!  

What you Need:
Popcorn Container (found at the Dollar Store)
2 Bags of Microwave Popcorn
2 Boxes of Candy
Ribbon
Card Stock to add the personal message

Add the popcorn and candy into the container.  I typed up the message in word and attached with a ribbon.  Oh yeah it was that easy!

I hope you have a wonderful day and maybe try out one of these easy Valentine's Day Gifts.

May the Force Be with You Valentine's Card

This weekend I had big plans to get all the boys valentines cards, treats and card boxes done ... BUT.  Well let's say a certain science project for Cole's class to make a Lava Lamp and the lovely display board that had to be done also took up MOST of my weekend!  Who knew a kids science project for a third grader could be so freaking time consuming.  That project I'll show next week.  This week I need to get the valentines done and posted before the actual date!

So needless to say I only got one done and it was the easiest of all the things I am going to do!  Jeez somedays I think I really need to rein it in ... oh yeah who am I kidding :).

I of course saw these on Pinterest and had to make them!  The boys LOVE all things Star Wars (oh yes boys after my and my dads heart).  I saw these May the Force be with You Cards on Stitch Creations.  

She was so sweet to actually give you a free printable in color or non color (click either link above to see the printables and her son that she actually took a picture of to make him part of the card ... very cool)!  I picked the color version and printed on some cream colored card stock paper.  I took my creative memories cutter and cut them down and used the blade to cut the whole for the glow stick.  It can be done with a pair of scissors also if needed (or a razor blade).  This really is so simple but what kid would not love a freaking glow stick card!  NOW one thing I learned is when you shove the glow stick in it will break which kind of is uncool when you give the card with a dead stick.  SO you use a glow stick that is broke to put threw to make the hole wide enough then take it out and add the new one.  I found this was the easiest to do, I did it for all the cards and only ended up with the one dead one!


This is going to be such a hit with Cole's friends, plus it gave me an idea of what to do for Cole's birthday invites that of course is going to be Star Wars themed :). 

Hope you all had a great weekend and for you who are stuck in the storm my prayers are with you!

Created by MyFitnessPal - Nutrition Facts For Foods

Thank You to My Wonderful Sponsors!!!

1800flowers
Baby Pop
BzzAgent
cafe Press
CSN
Easy Lunch Boxes
Faith Words
Glasses USA
Great Wolf Lodge
Hachette
Jump Start
My Baby Clothes Boutique
My Blog Spark
Ouchies
Pleasures.com
red envelope
She Speaks

tote bags
Strap Doctor
You Can Make This

Total Pageviews

Awards I've been Given! You Really Love Me!! (Yes my best Oscar Speech)

Photobucket
Photobucket
Photobucket
Photobucket
Photobucket
Photobucket
Photobucket
Photobucket
Photobucket
friendhip2 from Anissa
passoinate-blogger-award (Heidi @ Tried & True Cooking)
You're a Superstar Blogger
you-dont-say-post - Kristie Notes
Annisa (Over the top)
Jessica Mommy Needs Coffee (Lovely)
Annissa (Queen Award)
Your Blog is Fabulous
Best Comedic Performance
Splash Award
Best Blog Award
Dragon's Loyalty Award
Photobucket
The Heartfelt Award
Daffy Commenter Award
 
Pin It button on image hover