Protected by Copyscape Web Plagiarism Check

Tuesday, April 23, 2013

Star War's Party .... Yoda RSVP Cards & Ewok Gummies

We continue our Star War's party.  For Cole's class I wanted to do the light saber invites I posted yesterday.  Well then I looked at them and saw that the RSVP part was cut off when I had Kinko's print ... ugh!  So I needed a RSVP, so I made one up real quick.  I thought it would be  fun to do a Yoda card.


I went to Google and found a Yoda picture and added some fun sayings and done!

Will the force be with you?

*     Attending

Or Will you Turn to Dark Side?

Cant Attend?

Either Return this RSVP
RSVP Info
Name, # etc


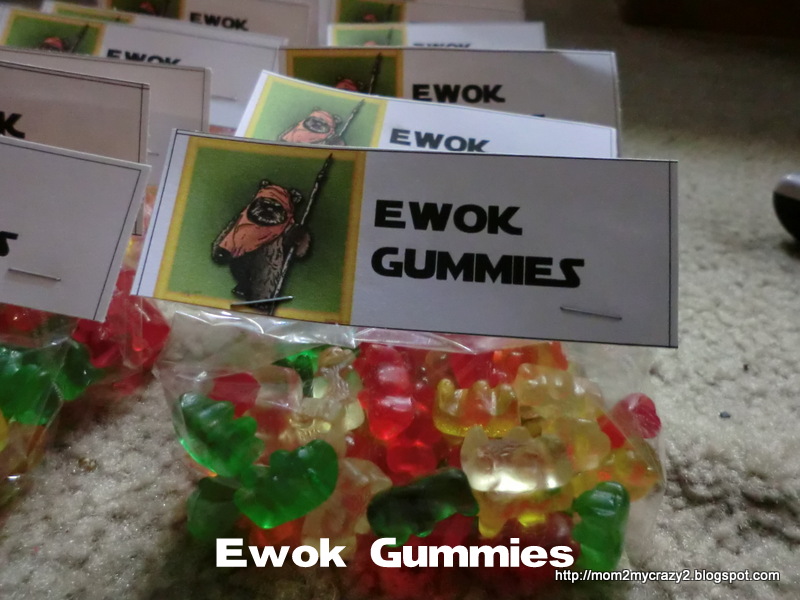
Next on the list was a quick goody bag for the classmates.  This was by far the easiest thing I've made so far!  I saw on several sites Gummy Bears or Sour Patch Bears for Ewoks.  I couldn't find a free printable I liked so I created one.  I went to Google found a Ewok picture and added the wording Ewok Gummies using the Star War's font I downloaded.  Simple and easy and I think so so cute!


What you need:
Small Clear bags - 40 count Dollar Store
Gummy Bears - Huge Bag at Walmart
Card Stock
Printer
Stapler

I put a heaping handful of Gummy Bears in a bag and added the card I made and stapled it shut!


Hope you give these a try!  I have Princess Leia Cupcakes and Darth Vader Cupcakes to show you tomorrow. 

May the Force be with you!

Don't forget to see the parties I link up to HERE.

Monday, April 22, 2013

Star War's Party ... Light Saber Invites

We have entered into party planning time here at the house.  Cole turns 9 tomorrow!  With Rick gone we had to push the party out an extra week which gives me a little more time to do all these fun things I saw on Pinterest!  I first started on a search for the perfect invite and a template how to do it.  I loved these Light Saber invites I kept seeing but they were on a site where you had to buy them.  You know me I rather make them!  After 1 1/2 hours of searching I stumbled across The Purple Patch who was so great and gave you a template you can print for FREE.  I love as you know these amazing people who offer templates!


Now I tweaked it a bit to fit my needs and also my time!  I had around 40 to make and knew that would be a LOT of cutting!!  She gave a template for the button's circle and square.  They are much smaller then mine.  I decided to use my Cricut with the font that came with it (Cricut® George and Basic Shapes Cartridge) and cut out a circle and square.  YUP that is ONLY after I went to THREE Micheal's and TWO Walmart's looking for punches to make these!  For the lines on the back of the light saber I tried a few of the rectangles on the Cricut but ended up using the I ... I know brilliant huh?


I used her template for the front (Black with Stars) and added my own wording.  I went on a search for the best wording.  I also downloaded a Star Wars font, but when I went to print at Kinko's it some how came out with normal writing.

A Long time
Ago ...
In a galaxy
Far, far away ...
A future Jedi
Was born.
His Name?
(insert Name) Skywalker

Please Join us
For his graduation from Jedi Academy

(Name) (bday #)th Birthday

Date
Location

Will the force be with you?

RSVP Info


I printed the backs at home on Grey paper.  I didn't use a shiny grey paper since I'm cheap ... lol I used just normal paper.  I cut the black circle button's on the cricut and the red square also on the cricut.  I printed the light saber's on green, red, blue and purple.  I then had to cut these out along with the front and back (this takes a LOT of time, if your doing a large amount plan on a cutting party).

What you Need to do:

  1. Head over to The Purple Patch to get the printables HERE
  2. Take the Black with Stars I cut & copied her template putting 3 per page in a word document and added the wording above. I printed at Kinko's to save my ink.
  3. Then at home I printed the grey, the light sabers, the circles, squares and the lines.
  4. Take the grey put tape all around except the top (so the light saber an stick out and it's suppose to be able to move up and down)! NOW my black and grey didn't line up just right so I did have to do a little trimming to make it perfect (but I'm also a little nutty).
  5. Add a light saber and top with the black part of the invite.  
  6. I then added the lines, square and circle.  I used a tape gun for most of the job when it ran out I did use glue.  The light saber is suppose to go up and down.  I found with my gluing that it didn't always allow for that.  But hey they still look cool.


These are time consuming but I think they turned out so cool!  I hope you give them a shot!  More fun Star War themed things to come, the next two weeks I have a lot to do and show!


May the Force be with you!

Don't forget to see the parties I link up to HERE.

Friday, April 19, 2013

Spring hasn't Sprung ... So we add color to me

Spring just isn't feeling like it right now and I just needed a pick me up!  My amazing cousin is a hairdresser on on her day off she let's me come over so she can do my hair.  With Rick gone the boys were able to play while she did my hair.  Of course 4 kids always lead to no peace but we made it through it.  So I gave myself a new blonde do and for fun we added some peek a boo pink on the side!  I thought it would be fun, heck I work at home so I don't have to worry about a dress code why not?

Here are some shots of my new do.  Ok so this is late at night and most of my make up was washed off from rinsing my head in her kitchen sink.

Side with just a pop of pink

Front mostly blonde

Side view with more pop of pink.

the back
(yikes my bathroom mirror needs to be cleaned)

Look I'm popping my collar ... lol
What the heck ... hehe

This is how I wear my hair most days so 
I can walk with out hair in my face

you can really see the pink.

Hope you all have a wonderful weekend!

Thursday, April 18, 2013

I'm Zooming up in the world ....

HEHE I couldn't help being cheesy!  I'm so excited my friend Robin at MassHole Mommy is on vacation this week and she asked if I would guest post.  She asked me to send a few of my favorite post to choose from and she picked my Motorcycle Diaper Cake that I made a while back for a friend.  It turned out very cute!  I hope you will stop by and say hi on my guest post.

A Sneek Peek of what the Diaper Cake looked like:
(Now go check out my guest post)
IMG_5223

My Guest post is here on MassHole Mommy.

I'm so excited to meet new people! 

Wednesday, April 17, 2013

Birthday Party Must ... Race Car Themed Cupcakes (All the tips I've seen on Pinterest wrapped into one CUTE package)

I'll apologize up front this is going to be a LONG post!  The recipes I used will all be featured so you can weed threw and find the one you want to make or make all the recipes to make these super cool cupcakes!  As you may have remembered I talked about in my post last Thursday, that I volunteered to make cupcakes for the cakewalk at the boys school Spring Fling this past weekend.  I was going to make 200 mini cupcakes, but then I heard some ppl would be donating cakes etc and thought that wouldn't be fair if one person got a pie and one got a mini cupcake.  So I switched to regular sized cupcakes.  I used a few cool tricks I saw on Pinterest.  I made red and white cupcakes (I took inspiration from Cookies and Cups picture).  For the dual frosting I found an idea to do two pipping bags on Blog Confetti Couture but my amazing friend who helped me decorates cakes and she just use one bag and put one color on one side and the other color on the other side (see picture below).   I also saw a great idea to put cupcakes in a clear plastic cup and clear bag and tied with a bow, I've seen it several blogs but I'll give credit to The Crafting Chicks.  The other recipes and links are below with recipes.

I first started out the homemade yellow cake mix that I showed on Friday's post.


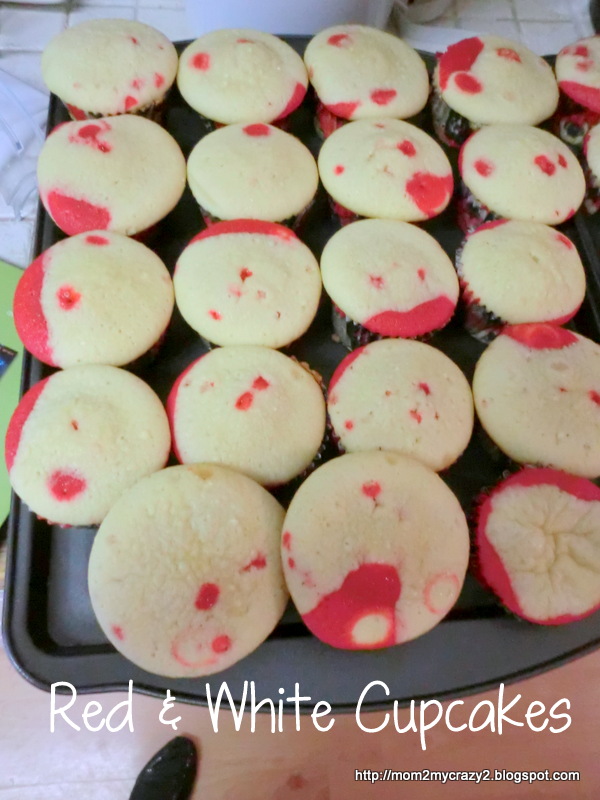
Since I made 98 cupcakes I tripled this recipe.  I made one that was doubled and kept it the white color.  Then I made another batch and used Wilton's Red Gel Icing Color to turn it that beautiful red color. I thought red and white cupcakes would be cool for a race car themed cupcake along with those are two of the three school colors.

Homemade Yellow Cake Mix
Ingredients:
2 cups all-purpose flour
1 1/2 cups sugar
1 tablespoon baking powder
1/2 cup non-fat dry milk
Combine flour, sugar, baking powder, and non-fat dry milk.

Add water, vanilla, butter, and eggs. Combine with an electric mixer then beat two more minutes. Pour into a greased and floured cake pan. Bake at 350-degrees cupcakes — 12-15 minutes.


For the two colors I split the batches and colored one.

The finished Cupcakes

Start with Mix, Add the wet ingredients, Dye one part and Bake them!

How to make the cupcakes

After the cupcakes came out and cooled down I took them to my best friends house to help me frost and make them pretty.  I first started by making the frosting, I found this AMAZING Sturdy Buttercream Frosting on Coleen's Recipes.  My friend tasted it for me and said it was excellent not too sweet and let me tell you it was so sturdy and easy to work with.  THIS will be the frosting I use from now on.  AND as a side NOTE always use butter when it calls for butter DON'T be cheap and try to use the cheap non butter.  FROM personal experience you get goop ... it doesn't come together it separates and you end up wasting money!

Sturdy Buttercream Frosting
Ingredients
1 cup white Crisco shortening
1 cup butter (room temperature)
6 to 6½ cups of powdered sugar
½ cup whipping cream
2 teaspoons vanilla extract
1 teaspoon almond extract (important)

In the large bowl of a stand mixer, whip the shortening and butter together for about 3 minutes on high. Add 6 cups of powdered sugar, the extracts and whipping cream to the butter mixture and whip ON HIGH for about 8 to 10 minutes.

Depending on climate, you may want to add an additional ½ cup of powdered sugar.
Once you frost your cake, put it in the fridge to let everything "set". Remove your cake from the fridge about an hour before serving.

ALEXIS NOTE: I used just almond instead of vanilla and almond (I personally prefer the taste).  I found this to be the best and putting in fridge is perfect to hold up for the next day or in my case 2 days later and they were still in perfect condition!


I made a double batch of the frosting and kept it white.  Then I made another batch and dyed that black with the Wilton's Gel Food Icing Coloring (I HIGHLY recommend using this instead of food color you buy at the store, taste better and color is better!  I buy mine at Walmart in the decorating section). 
Mix the Black in
Remember at first it will be Grey GIVE it a DAY

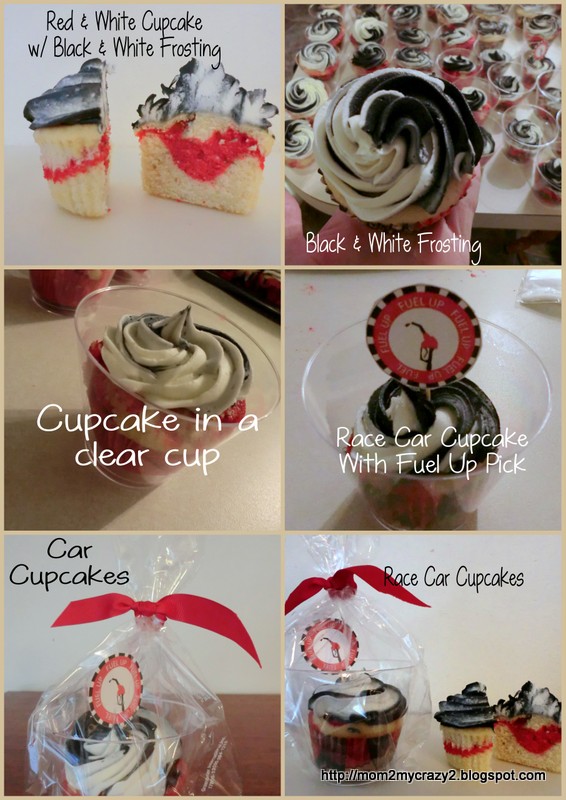
Now that frosting is done we go on to making the black and white swirled frosting.  My friend who does an amazing job at decorating cakes.  Did the pipping for me, she used one pipping bag with two colors.  NOW at first I was going to do Red & White ... But then I thought about the flag for the race is black and white how cool would it be to top with black and white to tie the cupcakes all together .. PLUS the school colors are Red, Black and White so I captured them all in the cupcake.

Cupcake with Black & White frosting


While my friend was doing the pipping I started to work on the Car themed Cupcake pick's.  I found this super cute design for Fuel up up on Vinnie Pearce's Blog.  She had them as stickers, I took her design copied and put in a word document to I could print 20 of them at a time.  I had this brilliant idea that every cupcake needed one!  YUP so I ended up printing and cutting 98 of them (well 100 in case I had any oopps).  Let's just say cutting out that many my fingers were hurting!  AFTER they were all cut out I took a little glue and glued a toothpick onto the back.  Then we added a cupcake pick to each cupcake!


And to finish off the look, I picked up some clear cups at the dollar store.  I got a pack of 10 for $1!  I even found clear bags 25 pack for $1 oh yes it was a score day!!!  Each cupcake fit nicely in the cup with out squeezing or knocking any frosting off ... PERFECT.  We then put a cupcake in a clear cup into a clear bag and tied with a bow either black or red.  My friend and Cole helped making all these looking pretty!  Thank God for them or I would have been up way past midnight!

Cupcake in a Clear Cup

How to Make Pretty

The Finished Project!

The Finished Cupcake

The finished look of both!

Phew .... that was a lot of work!  It ended up costing me around $60 to make these 98 cupcakes for the school.  BUT I got so many compliments, people actually thought they were bought from a bakery and I was told yet again that I need to go into business (one day my friends). This would be fun for a Race Car / Car themed birthday party.  You don't have to make as many as I did and can make them for around $20 to $30 for a normal party and just think that is what you would have spend on a crappy Costco or Walmart cake.  With a little love and thought you could have these!  You know me I rather make them then buy.

Thanks for hanging in for this super long post!
I hope you make these!

A recap of what we did:

Hope you have a great day, sorry I haven't been around I promise I will soon!

Don't forget to see the parties I link up to HERE.

Tuesday, April 16, 2013

Birthday Gift Ideas ... Another version of Sweet 16 Survival Guide (New Driver Kit)

A while back I showed you my Sweet 16 - New Driver's Survival Kit.  Well my bosses daughter turned 16 and I wanted to make something for her.  It would need to be something I can ship.  I thought of my kit I made before and kind of scaled it different to fit in a USPS box.  She got the cutest red BMW for her birthday, so I just had to make her something to go in it!


What you Need:
Bin 
Hand Sanitizer
Box of Band Aids
Box of Pain Reliever
Bottle of Lotion
Pack of Tissues
Hair Bands
Crackers
Pens
Pad of Paper
Gum
Cough Drops (because my mom says you always should have them)
Pack of Wet Ones (they get anything out)
2 $5 Bills (pinned to the side for emergency) - Totally forgot to pin this in!


I took this great bin (actually found at the dollar store!).  Arranged the items inside and pinned the 2 $5 Bills to the side (which I forgot for this bin).  I then went to my Cricut machine to make a cute sign.  You could do this by hand but I think it added a little something using my machine then added the letters to spell out "Sweet 16 Survival Kit".  I even added a few little flowers!  It took me less than 10 minutes to put together but it turned out so cute and it was the perfect size to be put in our car for all those moments when you may just need it.

Another twist on my previous New Driver Kit!

Don't forget to see the parties I link up to HERE.

Created by MyFitnessPal - Nutrition Facts For Foods

Thank You to My Wonderful Sponsors!!!

1800flowers
Baby Pop
BzzAgent
cafe Press
CSN
Easy Lunch Boxes
Faith Words
Glasses USA
Great Wolf Lodge
Hachette
Jump Start
My Baby Clothes Boutique
My Blog Spark
Ouchies
Pleasures.com
red envelope
She Speaks

tote bags
Strap Doctor
You Can Make This

Total Pageviews

Awards I've been Given! You Really Love Me!! (Yes my best Oscar Speech)

Photobucket
Photobucket
Photobucket
Photobucket
Photobucket
Photobucket
Photobucket
Photobucket
Photobucket
friendhip2 from Anissa
passoinate-blogger-award (Heidi @ Tried & True Cooking)
You're a Superstar Blogger
you-dont-say-post - Kristie Notes
Annisa (Over the top)
Jessica Mommy Needs Coffee (Lovely)
Annissa (Queen Award)
Your Blog is Fabulous
Best Comedic Performance
Splash Award
Best Blog Award
Dragon's Loyalty Award
Photobucket
The Heartfelt Award
Daffy Commenter Award
 
Pin It button on image hover