Protected by Copyscape Web Plagiarism Check

Sunday, January 15, 2017

Zombie Head Cookie Toppers for Cupcakes

The week  I was signed up for a cake delivery for a special 13 year old homeless girl in a shelter close to home. Many of you know I bake for a charity that brings birthday's to homeless kids in shelters around Washington. If you ever have extra party supplies or toys please think of Birthday Dreams, we can all make a child's special day be just that special! My heart and prayers go out to this family, they were staying in one shelter and then had a fire and had been moved to another shelter. For a full body Zombie, HERE is the post I did for my son's friends.

I found on Sweet Sugar Belle these cool zomibes that I felt would be perfect. I have NOT mastered her skills so mine are a little different, but I think still cool. I must say I was pretty happy with how it turned out. My royal icing was a bit runny for the details (eye, mouth etc).

I'm a bit obsessed with royal icing cookies right now. I've been using the cookies as the toppers for my cupcakes I make. It's like the best of all words a cupcake with tons of frosting and a cookie to eat also!! My youngest is obsessed with this technique, yup he's so my child all about the sugar (I have no clue where he would get this from ... as she whistles and looks away .... lol). Below are the cookies used and the cupcakes assembled (I also made eye's, you'll see that post tomorrow).

What you Need:
Skull Cookie Cutter (can double as a Zombie)
Frosted Cupcakes
Royal Icing - Green, Red, black and Blue (see recipe below)

Piping Bag of  the colored Royal Icing (for Mouth and Eyes)

I used the dipping method with my royal icing. I started to do the dipping method about 6 months ago to speed up my decorating time. You can pipe each cookie which is a little cleaner but I find the dipping method to be the best. You get your royal icing to the outline consistency and put into a pie dish (I find this is not too deep). Once dry you can add your details.

For the mouths and eyes, I took the royal icing to add the details (My royal icing was a little too runny and spread more than I wanted). I used the black for the mouth almost like a railroad crossing. I used the red to make a X for one of the eyes. I then took white piping bag to make a round circle. I let that set up a little bit (since it was so runny) and then took a piping bag to add a little color. Some eyes were blue and some were black.

Click HERE to see who I link with.
INGREDIENTS:
1 1/2 cups butter, softened
2 cups white sugar
4 eggs
1 teaspoon vanilla extract
5 cups all-purpose flour
2 teaspoons baking powder
1 teaspoon salt
DIRECTIONS:
1.In a large bowl, cream together butter and sugar until smooth. Beat in eggs and vanilla. Stir in the flour, baking powder, and salt. Cover, and chill dough for at least one hour (or overnight).
2.Preheat oven to 400 degrees F (200 degrees C). Roll out dough on floured surface 1/4 to 1/2 inch thick. Cut into shapes with any cookie cutter. Place cookies 1 inch apart on ungreased cookie sheets.
3.Bake 6 to 8 minutes in preheated oven. Cool completely.

Julie Usher, she has a GREAT YouTube video on how to make, color and make consistency adjustments

Royal Icing what you need:
2 lbs Powdered Sugar
1/2 tsp Cream of Tartar
5 Large Egg Whites (or equivalent) 
Flavor to Taste
Gel Icing Color

Mix powder sugar and cream of tartar in your mixer, just to make sure it is incorporated in. Slowly add egg whites, then whip start of slow then go to very high speed. She says around 2 minutes, my friend had an older mixer so it took almost 10 minutes. You want stiff peaks that hold on and won't fall off the spoon. Add in your flavor, I would suggest you use a clear flavoring.  This would be the glue texture great for ginger bread houses etc.

Take 1 cup of royal icing in a smaller bowl then add your coloring, lightly mix so you don't get air into the the icing. I'm like her and like the gel coloring. 

For Top Coating - Add 1 1/2 to 2 1/2 tsp Water (This is if you don't want to outline and flood)
For Outlining - Add 1/2 to 3/4 tsp Water
For Flooding  - Add 2 to 3 tsp Water

WATCH her video on How to Top-Coat, Outline, and Flood Cookies. YES it is around 7 minutes BUT if you have never done this technique it's a MUST she explains it perfectly.

Sunday, September 27, 2015

Beach Party Themed Cupcakes .... Fish and Octopus

We usually throw and end of summer start of school party at the lake. This year I had to go to Boston for work so we had to push it out a week. The weather was overcast and we had a few sprinkles but all and all it was a great party. Not many showed to this party but the one's that counted did. I think I may have to rethink having parties .. lol my turn out is getting to be low.

You know me and have to have a theme for all parties, and I went with the beach themed that I've done in the past with some new treats! I got most of the beach ideas from The Simple Parent.


First on the list to make was an easy Fish cupcake. I saw this idea and now can't find the page to link to them sorry.

What you Need:
Frosted Cupcakes (I tinted mine blue using Americolor Food Gel)
Colored Gold Fish
Black Frosting Gel
Decorating Pearls

Frost your cupcakes I used the feather tip to make it look like waves. I added 3 gold fish per cupcakes (using all the different colors). I used the black gel to add an eye to each gold fish. Then took decorating pearls to decorate the cupcakes like bubbles coming out of the fish breathing under water!

Next cupcake was the octopus. I saw on The Simple Parent using gummy worms and a gumdrop to make an octopus. I happened to go to Walmart candy section and bam I found octopus gummies! Less work is great for me!

What you need:
Frosted Cupcakes (I tinted mine blue with AmeriColor Food Gel)
Octopus Gummies (Or make your own with worms and a gum drop)

Frost your cupcakes I used the feather tip on these also to look like waves. I topped each cupcake with a octopus gummy and bam done!


Thanks for Stopping by!
Don't forget to see the parties I link up to HERE.

Thursday, September 3, 2015

Turtle Cupcakes Featured on Pin Me Linky Party 153

I'm so excited to see my Turtle Cupcakes were featured on Diana Rambles Pin Me Linky Party 153! These cupcakes are so cute and was so happy I was able to get 48 cupcakes done in one morning!

Diana-Rambles


Have a GREAT Weekend!!

Sunday, July 19, 2015

TMNT Themed Party .. Mountain Dew Cupcakes with Mountain Dew Frosting

For Caden's school party I made these Mountain Dew Cupcakes and they were such a hit I had to make them for the pool party we did also. These was a pretty simple recipe and the color was such a great pop and tasted pretty yummy also!


For Caden's class party I had a little more time on my hands so I made modeling chocolate TMNT characters to go on top. For the pool party I just featured the cupcakes!

Mountain Dew Cupcakes
1 cup butter (2 sticks)
2 cups sugar
4 large eggs
3/4 cup Mountain Dew
1/4 cup of lemon and lime juice (juice from 1 lemon and 1 lime)
zest from 1 lemon and 2 limes (separate into 2 piles, one for buttercream)
1 1/2 teaspoons lemon extract
2-3/4 cups all-purpose flour
1-1/2 teaspoons baking powder
1/4 teaspoon salt
** Neon food coloring (I added this in to the cake mix also)
1. Beat butter on medium for 30 seconds.
2. Add sugar and lemon, lime zest. Beat on medium-high until light and fluffy.
3. Add eggs one at a time, Scrape sides of bowl in between additions
4. Whisk together flour, baking powder, and salt in a bowl. Add to mixer bowl. Turn on low for 5 seconds.
5. Add the Mountain Dew, lemon/lime juice, and lemon extract (and food coloring) . Mix to combine.
5. Scoop into cupcake papers about two-thirds full.
6. Bake for 18-20 minutes until a cake tester comes out clean.
Mountain Dew Buttercream
1 cup butter (2 sticks)
4-5 cups powdered sugar
2 tablespoons Mountain Dew
Juices from half of 1 lemon and half of 1 lime.
Lemon and lime zest (rest of zest from cupcake recipe. Or zest from half of 1 lemon and 1 whole lime)
1 teaspoon lemon extract
neon green food coloring (yellow and blue if you dont have green)
1. Sift powdered sugar into a bowl or onto parchment
2. Beat butter at medium-high speed until creamy
3. Add half of the sugar, turn mixer on low for 5 seconds.
4. Add the Mountain Dew, zest, and lemon extract . Beat until combined.
5. Add food coloring to the desired color.
6. Gradually add remaining sugar until you get to the consistency and sweetness you like.
Making the Cupcakes:

Making the frosting:
Cupcakes on the table at Party!

Thanks for Stopping by!
Don't forget to see the parties I link up to HERE.

Monday, July 6, 2015

Firecracker Cupcakes

And for a cupcake for our 4th of July Party I found on Oh Nut's Firecracker Cupcakes. I took her cupcake and made it my own, I'm a use what you have on hand type of girl .. lol.


What you Need:
Marshmallow
Red Melts
Black Licorice
Frosted Cupcakes
Sprinkles (blue or red, white and blue)

Melt your red melts in the microwave (mine takes 1 min 30 secs - check after 1 min). Once melted (be-careful not to burn) dip your marshmallow into the melts. I used my candy melts spoon to get the marshmallow out. I placed onto parchment paper to dry. I had on hand black licorice (you can use black licorice wheel also). I cut my licorice into 4 pieces and then cut one end to look like a firework exploding! I took a plastic tooth pick to make a whole in the marshmallow and then pushed the licorice into the hole. I placed in the fridge to harden up.

I did a small amount of frosting on the cupcake and rolled in blue sprinkles. I then placed more white frosting on top of that. I then placed a marshmallow firework on top. I wanted a red, white and then blue look with the layers. 

LESSON LEARNED: Washington was having a crazy HOT day we hit around 98+ degree's we are use to high 70's. SO by the time I got to the party my cupcakes were melted ... LOL. Next year if it's this hot I'll skip the cupcakes.


Enjoy!!

Thanks for Stopping by!
Don't forget to see the parties I link up to HERE.

Sunday, April 19, 2015

Olaf Cupcakes (Made with Modeling Chocolate)

As most of you know I make cakes/cupcakes for a nonprofit that brings birthday's to homeless kids. Birthday Dreams is an amazing charity (they have a live auction going on now also to raise money).  I've done a Olaf Cake (click to see) for them so when I signed up for another one I went for cupcake decoration instead. I found inspiration on Pinterest of these Olaf's no person to give a shout out too. Her mouth's turned out so much better than mine, still working on that one!


What you Need:
Frosted Cupcakes
White Modeling Chocolate
Orange Modeling Chocolate
Black Modeling Chocolate
Candy Eyes
Circle cutter or fancy cutter
Small Circle Cutter for mouth
Small square Cutter for tooth

For those who have not seen my previous post on how to make modeling chocolate (aka candy clay) all pictured but the orange.

Modeling Chocolate
12oz Candy Melts
1/4 Cup light corn Syrup

Melt your Candy Melts in microwave (mine takes about 2 minutes). Stir them to become smooth and add the corn syrup.  It will become thick and form a ball.  Wrap in plastic wrap and let it sit out and dry.  Takes a few hours or over night is best. (Alexis note: I found to roll this out use a little powder sugar (like you would do with flour), also you have to kneed it a little like you would dough to make it easy to roll out).


Roll out modeling chocolate in white for the heads, cut out the rounds.  For the nose I took the orange modeling chocolate and formed a nose shape. The mouth I made a round circle and took a square to make a tooth spot. The white I took a square to form a tooth. I use Wilton candy eyes and took a small piece of the black to make eyebrows. 


Have a GREAT day!


Thanks for Stopping by!
Don't forget to see the parties I link up to HERE

Monday, March 23, 2015

Spiderman Cupcakes for Birthday Dreams

Next on my cupcakes list to do for Birthday Dreams (bringing cupcakes to homeless kids) was for Spiderman cake .. WELL what I wrote down was Spiderman what it was suppose to be was Batman.  I felt like such a boob, so have to much on my plate ... ugh.

What you Need:
Cupcakes
Frosting
Spider Cookie Cutter (I bought mine at Halloween from Michael's)
Spiderman cookie Cutter (I bought mine on Ebay)
Black Modeling Chocolate
Red Modeling Chocolate
White Modeling Chocolate

I found a recipe for Moist Chocolate Cupcakes on Food.com and made them, they smelled so good! This was a great easy and yummy recipe!


While the cupcakes were cooling, I found a recipe for Easy Chocolate Buttercream Frosting on Good Cheap Eats. Another super easy and yummy frosting, I found it a little thick so I added extra heavy cream to make it easier to pipe onto the cupcakes.


For those who have not seen my previous post on how to make modeling chocolate (aka candy clay) all pictured but the orange.

Modeling Chocolate
12oz Candy Melts
1/4 Cup light corn Syrup

Melt your Candy Melts in microwave (mine takes about 2 minutes). Stir them to become smooth and add the corn syrup.  It will become thick and form a ball.  Wrap in plastic wrap and let it sit out and dry.  Takes a few hours or over night is best. (Alexis note: I found to roll this out use a little powder sugar (like you would do with flour), also you have to kneed it a little like you would dough to make it easy to roll out).


For the Eyes I cut a small red circle from the candy clay.  I then took the inner eye and made white eyes that I attached to the red.


For the spider's I used a spider cookie cutter to cut out black spiders.


I attached the Spiderman Eyes and Spiders to the top of a frosted cupcake.


I box them up in the great clear cupcake boxes I picked up on Amazon.
And deliver them to the shelter.


Have a great week!

Thanks for Stopping by!
Don't forget to see the parties I link up to HERE

Monday, March 2, 2015

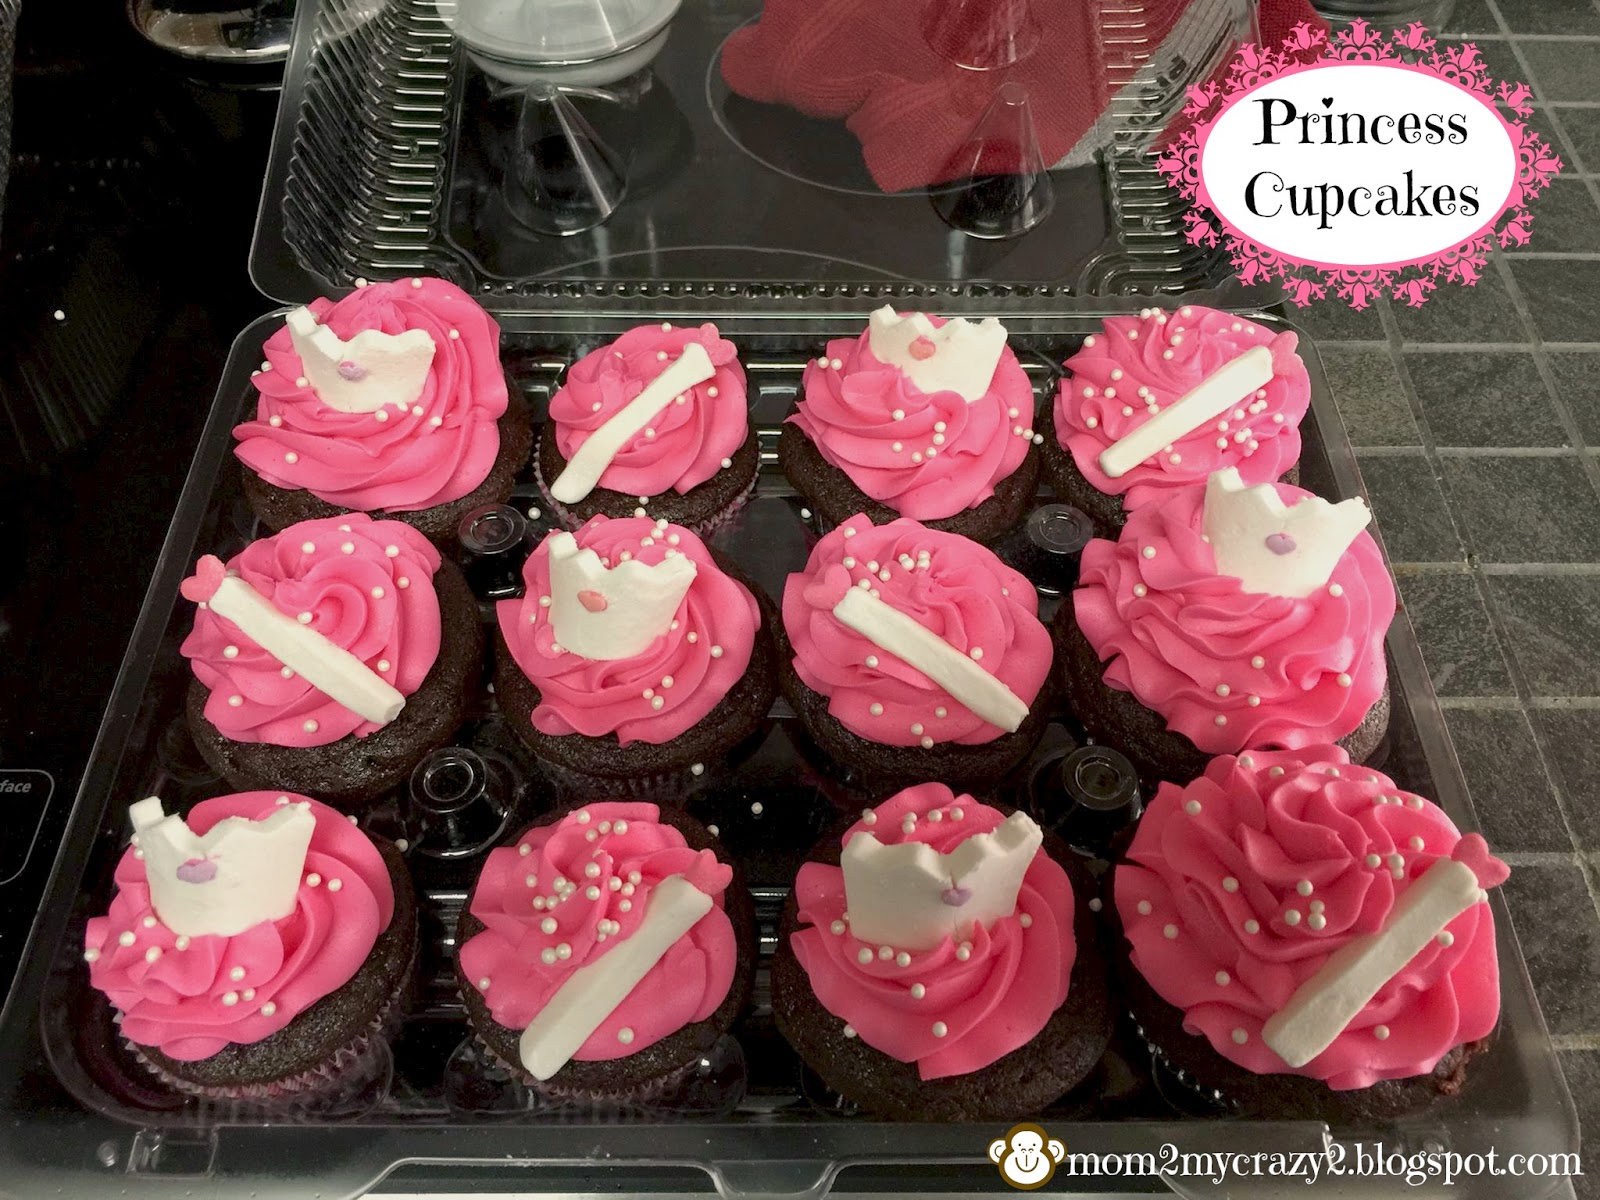
Princess Cupcakes ... Wands and Crowns

Also on my to do list I signed up for before I became very sick was Princess Cupcakes. I just love helping Birthday Dreams bringing birthday's to homeless kids, so I couldn't disappoint I had to make the cupcakes I signed up for.  So sorry no detailed pictures just the after picture of them going out the door.


What you need:
Frosted Cupcakes (I tinted my Sturdy Buttercream with Electric Pink AmeriColor)
White Modeling Chocolate

For those who have not seen my previous post on how to make modeling chocolate (aka candy clay).


Modeling Chocolate
12oz Candy Melts
1/4 Cup light corn Syrup

Melt your Candy Melts in microwave (mine takes about 2 minutes). Stir them to become smooth and THEN add the corn syrup (make sure all the lumps are smoothed out).  It will become thick and form a ball.  Wrap in plastic wrap and let it sit out and dry.  Takes a few hours or over night is best. (Alexis note: I found to roll this out use a little powder sugar (like you would do with flour), also you have to kneed it a little like you would dough to make it easy to roll out).

For the Wands I made strips of white modeling chocolate, then added a large pink heart at the tip. For the crowns I made square's from the modeling chocolate then took the top of a shoot star cookie cutter to cut out the top of the crown (you can do this with a knife also).  I added a small heart on the front of the crown. Frost your cupcakes then decorate with the pearls and top with a crown or a wand.

Thanks for Stopping by!
Don't forget to see the parties I link up to HERE

Sunday, March 1, 2015

Rock Star Cupcakes ... Microphones and Star (Modeling Chocolate)

The last 3 weeks I have been so sick ... yuck.  But of course I had previously signed up for cupcakes for the charity I work for Birthday Dreams (bringing birthday parties to homeless kids). So my cupcakes were not as beautiful as I usually would do, medicine head really can put you in a fog.  I signed up for a rock star themed cake, I had an idea to do mini microphones using mini cupcake cones. WELL during the winter finding those is IMPOSSIBLE! So I switched to making my own with Modeling Chocolate.


These were pretty easy to make and I added a few stars and done!

What you need:
White Modeling Chocolate 
Yellow  Modeling Chocolate
Wilton Licorice String
Edible Silver Dust
Frosted Cupcakes

For those who have not seen my previous post on how to make modeling chocolate (aka candy clay).

Modeling Chocolate
12oz Candy Melts
1/4 Cup light corn Syrup

Melt your Candy Melts in microwave (mine takes about 2 minutes). Stir them to become smooth and add the corn syrup.  It will become thick and form a ball.  Wrap in plastic wrap and let it sit out and dry.  Takes a few hours or over night is best. (Alexis note: I found to roll this out use a little powder sugar (like you would do with flour), also you have to kneed it a little like you would dough to make it easy to roll out).


For Microphones I made the white hand part out of white modeling chocolate and then dusted with edible silver dust.  I'm thinking next time a tootsie roll dusted would be easier ... lol. I took yellow modeling chocolate and made the balls for the top of the microphone. For the wire I used Wilton licorice string.  For the stars I used a cookie cutter and yellow modeling chocolate.


Have a great week!

Thanks for Stopping by!
Don't forget to see the parties I link up to HERE

Tuesday, November 4, 2014

Birthday Dreams ... SeaHawk Cupcakes

Next cupcake I signed up for was a SeaHawk's themed party.  For non football people like me the SeaHawk's is a football team here in Seattle that won the SuperBowl.  I just love this charity Birthday Dreams (bringing birthday's to homeless kids). 


Modeling Chocolate
12oz Candy Melts
1/4 Cup light corn Syrup

Melt your Candy Melts in microwave (mine takes about 2 minutes). Stir them to become smooth and add the corn syrup.  It will become thick and form a ball.  Wrap in plastic wrap and let it sit out and dry.  Takes a few hours or over night is best. (Alexis note: I found to roll this out use a little powder sugar (like you would do with flour), also you have to kneed it a little like you would dough to make it easy to roll out).


What you Need:
Frosted Cupcakes (I use my Sturdy Buttercream Frosting)
White Modeling Chocolate
Brown Modeling Chocolate
Black Modeling Chocolate
Blue Modeling Chocolate
Green Modeling Chocolate
Football Cutter
Circle Cutter
Number Mold

Cut a circle with a circle cutter Blue and Green.  On the Blue I added the Number 12 (Seattle Fans are known as the 12th man). On the Green I added SEA for Seattle.  I cut out brown footballs and added white for the laces.  This was on of the quickest cupcakes I've done so far.  I love that they are simple but fit perfect with the SeaHawk themes.


Thanks for Stopping by!

Don't forget to see the parties I link up to HERE

Monday, November 3, 2014

Birthday Dreams ...Lightening McQueen Cupcakes

Next cupcake I signed up for was a Car and Truck themed party.  I thought Lightening McQueen would be a fun cupcake to make.  Well I did have grand dreams of making him and his friends.  Let's just say after an hour of trying to make the friends I gave up and went to plan b and made my own design. I googled and got an idea and came up with this design. NOT my best cupcakes I've made but I think they were cute!  I just love this charity Birthday Dreams (bringing birthday's to homeless kids). 

Modeling Chocolate
12oz Candy Melts
1/4 Cup light corn Syrup

Melt your Candy Melts in microwave (mine takes about 2 minutes). Stir them to become smooth and add the corn syrup.  It will become thick and form a ball.  Wrap in plastic wrap and let it sit out and dry.  Takes a few hours or over night is best. (Alexis note: I found to roll this out use a little powder sugar (like you would do with flour), also you have to kneed it a little like you would dough to make it easy to roll out).


What you Need:
Frosted Cupcakes (I use my Sturdy Buttercream Frosting)
Red Modeling Chocolate
White Modeling Chocolate
Yellow Modeling Chocolate
Black Modeling Chocolate
Blue Modeling Chocolate

Cut a rectangle of white modeling chocolate I then took a cutter an cut out the corner.  I used a large red circle for the face.  I added the eyes and made two small blue circles with black to make the eyes.  I made lightening bolt of yellow modeling chocolate. And finished with a white mouth. Rather simple compared to other's I've done but I think they turned out pretty cute.

Thanks for Stopping by!
Don't forget to see the parties I link up to HERE

Created by MyFitnessPal - Nutrition Facts For Foods

Thank You to My Wonderful Sponsors!!!

1800flowers
Baby Pop
BzzAgent
cafe Press
CSN
Easy Lunch Boxes
Faith Words
Glasses USA
Great Wolf Lodge
Hachette
Jump Start
My Baby Clothes Boutique
My Blog Spark
Ouchies
Pleasures.com
red envelope
She Speaks

tote bags
Strap Doctor
You Can Make This

Total Pageviews

Awards I've been Given! You Really Love Me!! (Yes my best Oscar Speech)

Photobucket
Photobucket
Photobucket
Photobucket
Photobucket
Photobucket
Photobucket
Photobucket
Photobucket
friendhip2 from Anissa
passoinate-blogger-award (Heidi @ Tried & True Cooking)
You're a Superstar Blogger
you-dont-say-post - Kristie Notes
Annisa (Over the top)
Jessica Mommy Needs Coffee (Lovely)
Annissa (Queen Award)
Your Blog is Fabulous
Best Comedic Performance
Splash Award
Best Blog Award
Dragon's Loyalty Award
Photobucket
The Heartfelt Award
Daffy Commenter Award
 
Pin It button on image hover