Protected by Copyscape Web Plagiarism Check

Sunday, April 17, 2016

Command Center .. DYI Menu and Family Calendar Board

I'm back! It has been a whirlwind around here. Adding an exchange student means one more person's schedule added. I usually use my phone for my reminders and calendar BUT that only HELPS me. So after a friend suggested I make a calendar I went on a search on Pinterest to find a board I could make. I found several ideas using Dollar Tree picture frames as a white board of sorts. That also included make a board etc, well my husband is still out of town and I wasn't into any wood shop projects. So I went to Hobby Lobby and found my own board that matched my kitchen and added what I needed.

 
What I bought:
Tack Board (Reg $19.99 use their 40% off coupon on the app)
Clips (Found in the Scrapbook section $2.99 on sale for 50% off)
Mini clothing clips (On clearance $1.50 for pack of 4)
Hot Glue or Tacks (my board didn't allow for tacks so hot glue)
 
My board wasn't very thick so the tacks I bought to hold the clips on didn't want to nail in, so I switched to a hot glue gun and glued them on. I then placed the clips where I wanted everything.  
 
For my Menu Plan I went to google and searched Menu clip art. I found what I wanted and copied. I opened up word and made 4 boxes (use the column maker then you can make how big etc you want. I pasted the Menu photo and added the days of the week. You can also print off many free templates that I found while googling. Our week starts on Sunday and everyone I found starts on Monday so I had to make my own.
 
For the Calendar again went to word and made the boxes but selecting how many columns and rows I wanted and the wizard created. I googled different clip art for each family member (Rick / Security Guard, Me / Head Set, Cole / Basketball, Caden / Soccer / Ana / Brazil girl for where she is from).  I put the days of the week on top and the people on the left side. I then typed up the things I already have like school, YMCA Classes etc. Then room to write in more. 
 
My board cost me around $15. You could make for cheaper using the dollar tree items and plywood. But I liked the look of this more. I will be using more paper but maybe I'll find something else to do.
 
Thanks for stopping by and  putting up with me being MIA lately!

Don't forget to see the parties I link up to HERE.

Monday, October 5, 2015

Dum Dum Lollipop Tissue Flowers

For the Get Well Surgery Basket I posted yesterday I showed the Dum Dum Lollipop Tissue Flowers I made. They were so cool they deserved their own post. I saw in the picture I drew inspiration from for the basket these dum dum flowers. I went on a Google search and found a ton of tutorials. I used the tutorial on Garden Therapy.


What you Need:
Materials
  • at least 2 colours of tissue paper
  • scissors
  • single hole punch
  • lollipops
  • green electrical tape or floral tape
Instructions
Fold the tissue paper a number of times until you have a 5′ square. Cut a circle-like shape out of the folded paper, ending up with a organically-roundish pieces of tissue paper with a 4″ diameter. Choose a second color and cut another series of shapes with a 3″ diameter.
Pinch the rounds in the center by gently folding them in half. Use the single hold punch to make a center hole in the paper.
Put the lollipop stick through the hole and twist the papers so that the uneven edges are all on different sides.
Scrunch the paper together around the lollipop and use electrical or floral tape to secure the paper to the stick at the base of of the petals. Wind the tape around the stick to make a stem.
Scrunch and fluff up the tissue paper to give the petals a fuller, ruffled look.
Alexis notes: I didn't have green electrical tape so I used regular tape to hold the paper in place. I also just used one color for each flower. I also wanted to add a leaf so I Googled leaf templates and printed on green card stock. I attached with some tape. 

Thanks for Stopping by!
Don't forget to see the parties I link up to HERE.

Sunday, October 4, 2015

Get Well Surgery Basket

As you all know by now I'm a sucker for giving unique gifts! I hate just buying something I love to make something and it to be personalized for the person. BUT I also live in the real world and can't spend like $100 for said gift on the internet. So I try to find ways to make gifts and not go broke!

My boss was having knee surgery and I wanted to surprise her with a special gift in the mail (The live in RI and I live in WA so I need something that can be mailed). I googled get well surgery baskets and found a ton of ideas. I found this picture that is not attached to a site to give credit so if it's your's please let me know and I'll link to you.


What you Need:
Wet Ones
Hand Sanitizer
Kleenex
Headache Meds
Snacks (Fruit, Nuts Etc)
Candy (Chocolate always heals me .. lol)
Gatoraid
Caramex (Chapstick)
Gum
breath mints
Books / Magazines
Puzzle Books
Dum Dum Flowers (These are cool, I made it's own POST HERE).

I tried to find a cool Bedside Store Caddy like the one in the picture I found. Amazon only had this beige one which was more sophisticated for my bosses decor anyways so it worked! These are so cool they have a flap that you slide between your mattress and box-spring and the other part hangs on the side of your bed! It has a nice spot to fit's a large box of Kleenex. The other items I just fit and made it look nice. The hand sanitzer is the cool kind the you can link on the front.  Most of these items you can find in the dollar bins at Target / Walmart etc. Puzzles and books can always be picked up at the Dollar Tree. 


Thanks for Stopping by!
Don't forget to see the parties I link up to HERE.

Sunday, December 29, 2013

The Best of 2013 ... January to April

Instead of one crazy long post I thought I would break the best of 2014 into 3 post of the next few days.  Yup to make it easier plus I'm slammed at work and the house so I'm running out of time to post things I've done ... LOL.

Here are a few of the highest viewed post on my blog January to April 2013!

Viewed 1204 Times

Viewed 1231 Times

Viewed 1561 Times

Viewed 1326 Times

Viewed 1919 Times

Viewed 1505 Times

Viewed 1505 Times

Viewed 3346 Times

Viewed 3346 Times

Viewed 1591 Times

Viewed 7288 Times

Viewed 1598 Times

Viewed 3751 Times

Viewed 1446 Times

Viewed 1258 Times

Viewed 6722 Times

Viewed 1085 Times

Viewed 4421 Times

Viewed 6720 Times

Viewed 6408 Times

Viewed 6408 Times

Viewed 1041 Times

Viewed 1165 Times

Viewed 1219 Times

Viewed 1837 Times

Viewed 4385 Times

Viewed 1094 Times

Hope you all have a wonderful day!

Sunday, December 15, 2013

Tis the Season ... Making Gingerbread Houses

The boys and I got together with my girlfriend and her son to make gingerbread houses!  I of course had to make the gingerbread house from scratch ... lol.  Sometimes I need to listen to Rick and just buy one.  BUT it sure was fun to watch the boys decorating them, that was when I was being sick in the bathroom.  YUP I got sick right as we started to decorate the houses.  Next year I will buy the cookie cutters instead of using a piece of paper and cutting each one out.  They weren't perfect but still worth it!

I found the recipe for the house and icing along with a template to use to cut the house on Sweetopia she even has a video on there if you need a little extra help!


Gingerbread Cookie Recipe
Ingredients:
2 Sticks unsalted butter
1 cup packed dark-brown sugar
3 teaspoons ground cinnamon
3 teaspoons ground ginger
1 teaspoons ground cloves
2 large eggs
1 cup molasses
4 cups all-purpose flour
1 teaspoon salt
1 teaspoon baking powder

Instructions:
1. In the bowl of an electric mixer fitted with the paddle attachment; mix butter and brown sugar on medium speed until fluffy.

2. Mix in spices first, then eggs and molasses.

3. Sift together flour, salt and baking powder and add to bowl; mix until just combined.

4. Wrap dough in a disc shape in saran wrap. Let it rest by refrigerating until cold, about 1 hour.

5. Preheat oven to 350 degrees Fahrenheit. Roll out dough on a lightly floured work surface or between two sheets of parchment paper to about 1/4-inch thick.

6. Cut shapes out with cookie cutters and place them approximately 2 inches apart on baking sheets lined with parchment paper.

7. Refrigerate until firm; at least 15 minutes to 1 hour.

8. Bake cookies until crisp; 12 to 14 minutes. Let cool on sheets on wire racks.


Royal Icing Recipe
Ingredients:
6 oz (3/4 cup) of warm water
5 Tablespoons Meringue Powderhttp://www.assoc-amazon.com/e/ir?t=sweetopia-20&l=as2&o=1&a=B0018AN27O
1 teaspoon cream of tartar
1 kilogram (2.25 lbs.) powdered icing sugar
*** Note; if your meringue powder has no vanilla flavor (vanillin powder) in it, add a teaspoon of clear vanilla to this recipe.

Directions:
In mixer bowl, pour in the warm water and the meringue powder. Mix it with a whisk by hand until it is frothy and thickened…about 30 seconds.
Add the cream of tartar and mix for 30 seconds more.
Pour in all the icing sugar at once and place the bowl on the mixer.
Using the paddle attachment on the LOWEST speed, mix slowly for a full 10 minutes. Icing will get thick and creamy.
Cover the bowl with a dampened tea-towel to prevent crusting and drying.
Tint with food coloring's or thin the icing with small amounts of warm water to reach the desired consistency. 

I doubled the recipe to make 3 houses!
A little extra dough for a few men too!!


They may not be professional looking but the boys loved them!


Hope you try this!  So much for the whole family!


Thanks for Stopping by!
Don't forget to see the parties I link up to HERE

Sunday, November 3, 2013

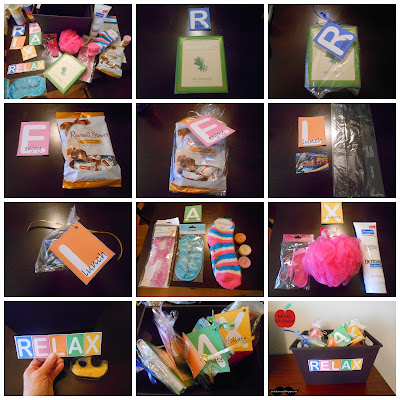
Personal Gift Idea .... RELAX Gift Basket

Getting close to the holidays I'm going to show off some fun personal gift ideas you can make for the holidays, birthdays or a just because gift!  This is a fun gift that was easy to put together for Cole's Teacher for her birthday.  It cost around $20 to make and was a priceless gift I must say so ... lol.

I found this RELAX gift idea with FREE printable on Little Miss Suzy Q's site.  She had it listed great so it was easy to buy for and put together. 


Here is what she had listed:
Read- Book, reading glasses ,book light, gift card to a favorite bookstore.
Enjoy-chocolate, favorite candy bar, CD, DVD, I did Cutler's cookies (if you live in Davis County, you know why).
Lunch-gift card to a favorite sandwich shop, Lunchable, coupon for a lunch date on you.
Alleviate-lotion, fuzzy socks, sleep mask, pedicure gift card.
Exfoliate-Loofa, foot scrub, pummis stone or file.

Here is what I did:
R - Read - Book (It's hard Being Green, by Jim Henson)
E - Enjoy - Bag of Chocolate
L - Lunch - Gift Card to Subway ($5)
A - Alleviate - Fuzzy Socks, Sleep Mask, Gel Mask and Candles.
X - Exfoliate - Lotion, Loofa and Pedicure Set.

Extra Items you need:
Bin - $1 at Dollar Tree
Clear Bags - $1 (25 pk) Dollar Tree
Ribbon - $1 Dollar Tree (Blue, Pink, Orange, Green, Yellow)
Hole Punch

I picked up most of these items at the Dollar Tree.  I found a bin that could fit it all in and then medium sized bags and tied with matching ribbon to the color of the letter template she gave as a free printable.  I punched a hole in each letter and tied with the coordinating ribbon to the color of the letter.


I got a very sweet thank you card from Cole's teacher.
This was very simple!

Thanks for Stopping by!
Don't forget to see the parties I link up to HERE.

Sunday, October 27, 2013

Boo to you from our crew - DYI Minion Costumes Made

When they say it takes a village to raise a child it took a village to make these costumes.  Let's just start up front I'm not a sewer.  I can rock a hot glue like no tomorrow, but a sewing machine kind of scare's me!  I put a SOS out of FB and a friend let me borrow her mom's sewing machine (a great machine that is 30+ yrs old and had only been used 2 or so times).  Then the amazing Stacy from Stacy Uncorked came over at 7p to help me sew pants.  NOW my job was to measure said pants!  WELL let's just go back to the statement above I'm not a sewer.  So the pants came out great just way too large!  So SOS #2 on FB and another amazing friend (who mind you is a friend of a friend) that stepped up over and beyond came to my house to help me figure out what I did to the machine that was now not working.  Well it didn't work so in the cars we went and went to her house.  She set me up in front of her machine (YUP you read that correct I sewed).  I fixed the pants and even sewed on the straps for the overalls!  I ended up staying up until Midnight Saturday night but they came out pretty awesome!


I first saw this awesome idea for Homemade Minions on The Home Place.  She did an awesome job and her's came out awesome.  I'm going to break down her steps for us that are sewing challenged and need the extra steps (ok the Dummies Guide to Minions).

Here are the costumes done.
I'll come back Wednesday when we go to the church party and kids all done up.


What you Need (This is what I needed for 2 minions adjust on the # you make):
2 Rolls of 1 inch foam (I used 2 rolls for 2 minions)
Bright yellow spray paint
Bright purple spray paint (Cole wanted to be the evil minion ... go figure)
1 packages of black pipe cleaners (cut half)

1 Purple Feather Boa
2 Pkgs Velcro (self adhesive - but still hot glued it down)
Hot glue gun
1 bag Hot glue sticks (I used close to 40 or 50 of the small sticks)
1 Round cardboard container (Oatmeal Carton - Worked perfect)
2 Sheets black felt
Scissors
Sewing Machine
Thread (Blue, Yellow, Purple and Black - or be lazy like me and use one color)
3 yards Blue Fleece
1/2 yard Yellow Fleece
1/2 Yard Purple Fleece

1/2 Yard Black Fleece

Wrap Foam around each child to see how much you will need.  I found that I needed a roll per kid and then had left over that couldn't be used (I so was hoping one roll would be enough since it was like $16 a roll but no go).  You can be professional and make a line with a pencil and then cut, or be like me wrap then with your finger place where it needs to be cut and then cut it.  OK this is where the inexperience sewer came into place, she said make 7 points (I thought this was some trick NOT make 7 triangle cuts).  If you ONLY make 7 triangles that will make it easier to close the top of the head up.  MINE was a little hard, thanks to Rick and a can of spray glue.

I took my minions outside and sprayed them down in the driveway.  I found one can did the job but if I wanted to be picky it could have used another good coating if I bought another can of paint.  I left them outside for a half hour or so to make sure they were dry.

The side seam glue down about 5 inches and then add your Velcro.  I ended up hot gluing the Velcro to the foam to make sure it stayed in place (the self adhesive didn't hold very well).  Take the oatmeal container and cut into a round circle that will be for the eye to keep it sturdy.  I had the kids put the minions on with a pen I had them mark where their nose was (for the center of my circle for the eye) and then I marked where there shoulders hit.  I then had them take it off, I took the oatmeal circle and made it a stencil and cut it out.  I used my circle cookie cutters to cut the arm holes out.

I took the fleece and place a long sleeve shirt of the boys as a point of reference and added a little length and width. I should have made them come in instead of one long tube but I wasn't into perfect I just wanted to get this done .. lol.  NOW I should have taken the same concept with the pants I tried to eyeball it with taking the fleece going around half the foam body and then finding the inseam.  Let's just say this didn't work in my favor the pants became HUGE and I had to do an emergency take them in moment.  Take some pants for the child and then add a little to the length and more for the width place on foam to make sure they will fit over the foam but not fall off either (like mine did).  I made a traditional overall, with a little square for the front and then added two strips for the straps (I folded mine over so they were a little thicker and padded).  For the logo I made a circle out of the black felt and then for the G I went online printed out the G and cut it out of yellow fleece.  I then hot glued the black circle down and then the G in the center.  I hot glued the sleeves into the arm holes.

For the Yellow Minion I took Black pipe cleaners I cut in half then hot glued them to the top, sticking straight up.  For the Purple Minion I took a purple feather boa I found at the dollar store and hot glued it down.  She had a hole on the top of her head, but with Rick on the head duty he glued that whole thing down!  But it worked just fine hot gluing to the foam.

To finish up I cut a long strip of black fleece to line the inside of the eye.  I hot glued the down and tried to make it so it was smooth (but it was me so it's a make it work moment).  I cut a longer strip of black fleece to fit around the foam head to be strap of the eye hole.

I must say this costume was so much more money then running to the drug store and picking one up.  Half way through it I wanted to give up and so glad I didn't because they turned out so cute!


You may end up with a little paint on you .. lol

And don't let a child distract you!
Oh yes a HOT Glue Gun Burn ... OUCH

So what do you think??

Thanks for Stopping by!
Don't forget to see the parties I link up to HERE.

I fun quote that I had to share, so perfect for this!


Clothes make a statement.  
Costumes tell a story.  
~Mason Cooley

UPDATED PHOTO OF BOYS!

Created by MyFitnessPal - Nutrition Facts For Foods

Thank You to My Wonderful Sponsors!!!

1800flowers
Baby Pop
BzzAgent
cafe Press
CSN
Easy Lunch Boxes
Faith Words
Glasses USA
Great Wolf Lodge
Hachette
Jump Start
My Baby Clothes Boutique
My Blog Spark
Ouchies
Pleasures.com
red envelope
She Speaks

tote bags
Strap Doctor
You Can Make This

Total Pageviews

Awards I've been Given! You Really Love Me!! (Yes my best Oscar Speech)

Photobucket
Photobucket
Photobucket
Photobucket
Photobucket
Photobucket
Photobucket
Photobucket
Photobucket
friendhip2 from Anissa
passoinate-blogger-award (Heidi @ Tried & True Cooking)
You're a Superstar Blogger
you-dont-say-post - Kristie Notes
Annisa (Over the top)
Jessica Mommy Needs Coffee (Lovely)
Annissa (Queen Award)
Your Blog is Fabulous
Best Comedic Performance
Splash Award
Best Blog Award
Dragon's Loyalty Award
Photobucket
The Heartfelt Award
Daffy Commenter Award
 
Pin It button on image hover